In the middle of this playing card is a color chip of Pardo Translucent.
Its just a small chip about 3/4 square, and the thickest setting (7) of my pasta roller.
AND its the clearest I have ever seen.
I didn't have to do anything tricky like quench it in water, or use a heat gun until it smoked.
Just amazed. I like Pardo more and more.
Showing posts with label color. Show all posts
Showing posts with label color. Show all posts
Monday, January 10, 2011


Tuesday, June 2, 2009
Paisleys and dots

Applying color theory to creating a colorful paisley and dot pendant.
 Place a sandwich baggie smooth over the surface of the clay. Press into the clay, through the baggie, with a round cookie cutter-about 2 inches in diameter. The sandwich baggie makes a nice beveled edge to the cut shape.
 Using a small round Kemper punch cut out several small dots. Roll these into small balls. Using the small round punch, cut a hole into the top of the pendant base. Approximately 1/4 inch from the edge.
 Using a small tear drop shape cookie cutter, cut 3 shapes. Use your fingers to gently curve the tear drops into paisleys.
 Arrange the paisley shapes and dot balls in a pleasing arrangement. For smaller dots cut the punched dots in half.
 Place a hot set crystal on one of the larger dots as accent bling. Use the tip of a knitting needle to push accent dots into the centers of the clay dots, and along edges of shapes.
 Use color theory principles to help select pigment powder colors. Apply colors loosely with soft brush. Do not inhale the pigment particles, cover your mouth and nose, and use in a well ventilated area.

This pendant takes approximately 1/4 of a standard sized block of polymer clay. Using a neutral color, condition and roll out a section of clay. Roll your section on the second or third to largest setting of your pasta machine. (The largest for my machine is a 7-I rolled my clay at 5).
Fold the clay over on itself and lightly press together--doubling the thickness, and removing any air bubbles.
Place a sandwich baggie smooth over the surface of the clay. Press into the clay, through the baggie, with a round cookie cutter-about 2 inches in diameter. The sandwich baggie makes a nice beveled edge to the cut shape.Roll the remaining clay back thru the pasta machine, at the same setting. The remainder of the shapes will be cut from a single layer of the clay.
Using a small round Kemper punch cut out several small dots. Roll these into small balls. Using the small round punch, cut a hole into the top of the pendant base. Approximately 1/4 inch from the edge.Using a small tear drop shape cookie cutter, cut 3 shapes. Use your fingers to gently curve the tear drops into paisleys.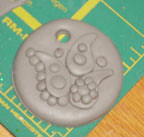 Arrange the paisley shapes and dot balls in a pleasing arrangement. For smaller dots cut the punched dots in half.Place a hot set crystal on one of the larger dots as accent bling. Use the tip of a knitting needle to push accent dots into the centers of the clay dots, and along edges of shapes.
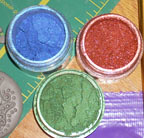 Use color theory principles to help select pigment powder colors. Apply colors loosely with soft brush. Do not inhale the pigment particles, cover your mouth and nose, and use in a well ventilated area.
Cure following the polymer clay brand's instructions. When cool brush off any excess pigment powders and coat with Varathane, or your polymerclay coating of choice to protect the mica pigment colors on your design.
Sunday, May 3, 2009
Color theory with mica pigment powders
Color theory is the study of mixing color and the visual impact of certain color combinations. There are many aspects to be taken into consideration when studying color. The form of the color —opaque pigment, translucent inks, transparent light—impact how colors interact and mix.
Mica pigment powders are ground natural mineral (mica) flakes coated with and oxide, usually titanium or iron. The granules of the flakes are solid and reflect light; therefore they are discussed in terms of opaque pigments.

There are three primary colors when dealing with opaque pigments: red, yellow, and blue. These are base, or pure colors. These colors, or hues, cannot be achieved through mixing.
Hue is the name of a color (red, purple). It's easy to remember: Hue and Hugh are both names. Hue is a color’s name, just as Hugh is a man’s name.
The three primary hues are the basis of the color wheel. Think of a rainbow in a circle, showing the range of hues that can be created when the primary colors are mixed. A basic color wheel shows primary and secondary hues. Secondary colors are achieved by mixing two primary colors.

Yellow+ red= orange
Red+ blue=violet
Blue+yellow=green
Tertiary, or intermediate, hues are the next level of color blends.

Green+blue=aquamarine
Analogous colors are hues that are next to each other along one side of the color wheel. Think of the colors as being in “rainbow order.”

Complementary colors are in opposite positions on a color wheel.

Blue-orange
Yellow-violet
Red-green
Split complementary hues are colors that are in opposite position on a color wheel, with one of the colors of the pair, shifted to the left or right

Aquamarine-orange
Indigo-yellow
Tints and shades are achieved by mixing a pure hue with white or black. Tints are lighter, and shades are darker. Tints can be achieved with mica pigments on clay by varying the quantity used. Both tints and shades can be achieved through blending pigments together.
There are many ways to help with the selection of color combinations. Magazines frequently will publish color pallets (a selection of hues) that they predict will be the season's popular colors, or are currently the popular colors. Keeping notes in your sketch book of color combinations you have seen and like, will help on future projects. Color choice is always going to be subjective, simply because different people favor certain hues over others.
Analogous colors are always pleasing combinations. An analogous range can be created with a “jump” or skip over a single color in the range.
To “jazz-up” a selection of analogous hues, add an accent color – such as in the example:
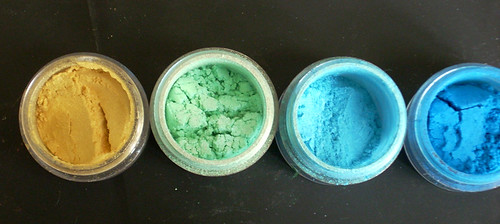
Yellow-aquamarine-blue (green was skipped)
Accent colors work well when they add contrast. A good way to achieve this is to select a complementary color.
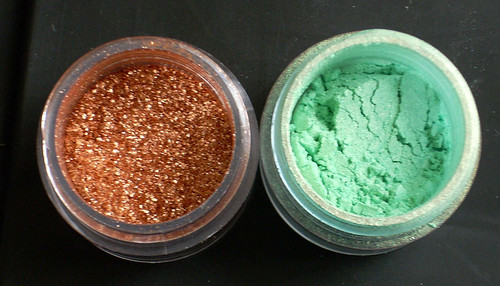
Pure complementary colors can be a bit jarring—think of bright red and green together. A modified complementary combination can be quite pleasing. Using a combination of split complementary with tints of the hues create very successful combinations. Copper and turquoise are a good example of this: copper represents the orange hue and turquoise is a tint of the aquamarine hue.

When planning on using mica pigments, the clay body color needs to be taken into consideration. The hue of the clay body will impact the tint and intensity of the applied mica pigments. Colors will not appear as bright on white as they will on black. Using a neutral base will give a more subtle effect.

When using colored clay make pigment selections based on analogous hues. Using complementary hued pigments on colored clay will dull down the overall appearance. Interference, or color shift, pigments incorporate a bright accent hue- so the pigment seems to shimmer in a different color. Frequently the shift is to a complementary hue, or using a bright color on a colorless base. These are great for adding “jazz.” You need to pay attention to the shift color when using interference pigments. You don’t want to lose an exciting color shift by applying the pigment to a base clay the same color as the interference shift. Applying a color-less interference powder with a complementary color to a colored clay base will not dull the overall appearance but add the “oohhh aahh" effect.
Pigments can be blended to achieve almost any hue on the color wheel. Warning: when blending colors limit how many you use. Too many colors mixed together tend to end in a muddy color. Blending of complementary colors will also result in a mud color. Mica pigments are available commercially for the arts and crafts industry. Mica pigments make-up is also available, and can be used on polymer clay. Expanding into the world of powder and pressed powder eye shadow expands the range of hues and tints available. There are so many hues available it's almost not necessary to every need to blend pigments.
Always use mica powders safely. Use in a well ventilated area, and protect your lungs by wearing a face mask. Mica pigments are made from minerals and oxides, not something you want to inhale.
Mica pigment powders are ground natural mineral (mica) flakes coated with and oxide, usually titanium or iron. The granules of the flakes are solid and reflect light; therefore they are discussed in terms of opaque pigments.
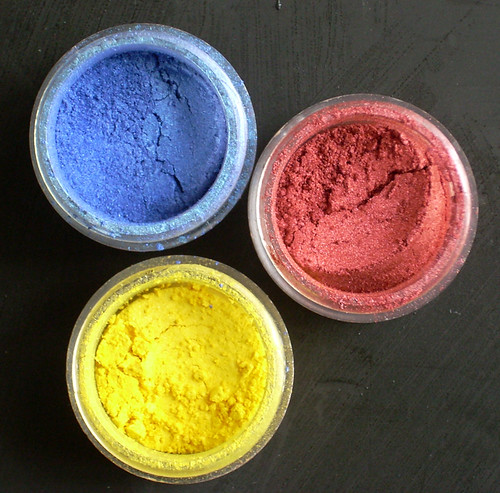
There are three primary colors when dealing with opaque pigments: red, yellow, and blue. These are base, or pure colors. These colors, or hues, cannot be achieved through mixing.
Hue is the name of a color (red, purple). It's easy to remember: Hue and Hugh are both names. Hue is a color’s name, just as Hugh is a man’s name.
The three primary hues are the basis of the color wheel. Think of a rainbow in a circle, showing the range of hues that can be created when the primary colors are mixed. A basic color wheel shows primary and secondary hues. Secondary colors are achieved by mixing two primary colors.
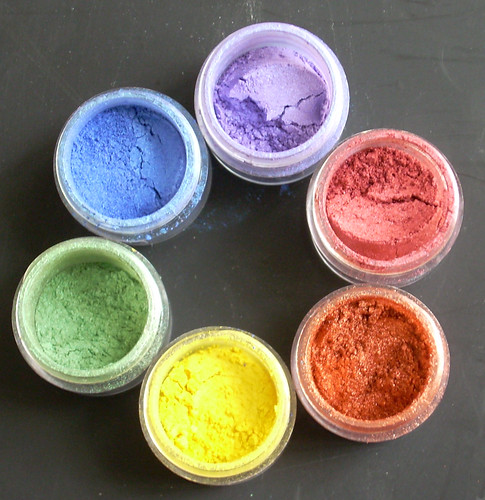
Yellow+ red= orange
Red+ blue=violet
Blue+yellow=green
Tertiary, or intermediate, hues are the next level of color blends.

Green+blue=aquamarine
Analogous colors are hues that are next to each other along one side of the color wheel. Think of the colors as being in “rainbow order.”
Complementary colors are in opposite positions on a color wheel.
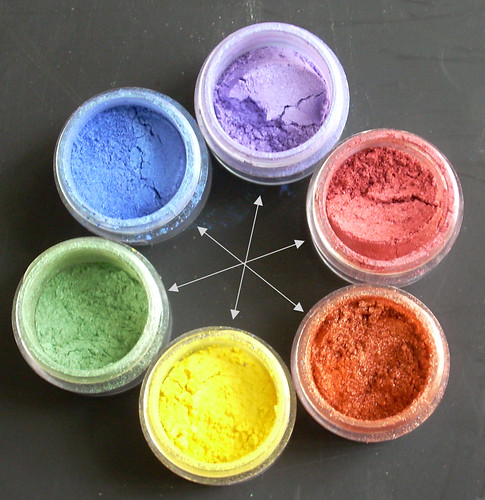
Blue-orange
Yellow-violet
Red-green
Split complementary hues are colors that are in opposite position on a color wheel, with one of the colors of the pair, shifted to the left or right

Aquamarine-orange
Indigo-yellow
Tints and shades are achieved by mixing a pure hue with white or black. Tints are lighter, and shades are darker. Tints can be achieved with mica pigments on clay by varying the quantity used. Both tints and shades can be achieved through blending pigments together.
There are many ways to help with the selection of color combinations. Magazines frequently will publish color pallets (a selection of hues) that they predict will be the season's popular colors, or are currently the popular colors. Keeping notes in your sketch book of color combinations you have seen and like, will help on future projects. Color choice is always going to be subjective, simply because different people favor certain hues over others.
Analogous colors are always pleasing combinations. An analogous range can be created with a “jump” or skip over a single color in the range.
To “jazz-up” a selection of analogous hues, add an accent color – such as in the example:
Yellow-aquamarine-blue (green was skipped)
Accent colors work well when they add contrast. A good way to achieve this is to select a complementary color.
Pure complementary colors can be a bit jarring—think of bright red and green together. A modified complementary combination can be quite pleasing. Using a combination of split complementary with tints of the hues create very successful combinations. Copper and turquoise are a good example of this: copper represents the orange hue and turquoise is a tint of the aquamarine hue.
When planning on using mica pigments, the clay body color needs to be taken into consideration. The hue of the clay body will impact the tint and intensity of the applied mica pigments. Colors will not appear as bright on white as they will on black. Using a neutral base will give a more subtle effect.
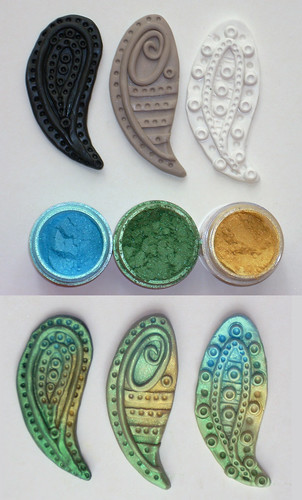
When using colored clay make pigment selections based on analogous hues. Using complementary hued pigments on colored clay will dull down the overall appearance. Interference, or color shift, pigments incorporate a bright accent hue- so the pigment seems to shimmer in a different color. Frequently the shift is to a complementary hue, or using a bright color on a colorless base. These are great for adding “jazz.” You need to pay attention to the shift color when using interference pigments. You don’t want to lose an exciting color shift by applying the pigment to a base clay the same color as the interference shift. Applying a color-less interference powder with a complementary color to a colored clay base will not dull the overall appearance but add the “oohhh aahh" effect.
Pigments can be blended to achieve almost any hue on the color wheel. Warning: when blending colors limit how many you use. Too many colors mixed together tend to end in a muddy color. Blending of complementary colors will also result in a mud color. Mica pigments are available commercially for the arts and crafts industry. Mica pigments make-up is also available, and can be used on polymer clay. Expanding into the world of powder and pressed powder eye shadow expands the range of hues and tints available. There are so many hues available it's almost not necessary to every need to blend pigments.
Always use mica powders safely. Use in a well ventilated area, and protect your lungs by wearing a face mask. Mica pigments are made from minerals and oxides, not something you want to inhale.
Friday, March 6, 2009
BEADS!
Ok so I have been obsessing about beads. Making them. I went to a little bead and gem show and there was this nice lady there who spend a lot of time with myself and my daughter, explaining things to the kid. Of course kid was just being a sponge and soaking in all kinds of information. The lady was selling these things called inside out beads. They were fascinating. Not quite cane work in polymer but similar. We bought some of her lovely beads. At home I spent 4 hours figuring them out!
So now Ive been playing with making beads. These samples of mine arent even my best ones--just the ones I have a photo of! lol!
I went searching to see what others are doing bead creation-wise.
There is some very beautiful work out there for the buying!

SarajaneHelm.etsy.com
This set of beads has a nice spring like quality with out the pollen.


heres another nifty set of beads. I love the swirlies! Im still developing the skills to do the swirly shape--its not as easy to get a really good and clean swirl as they make it look. These are by oneandonly.etsy.com
Wednesday, July 30, 2008
PCAGOE monthly challenge
"Its Show Time"
This months challenge was based on TV or Movies we love.
This months challenge for me was time and space related.
I have entirely too many movies that I LOVE I couldn't think of anything that I could do in a timely fashion. I kept thinking what what what.
ideas that surfaced included Highlander, 1001 Arabian Nights, 300, The Mummy, Eragon. All the ideas that stemmed from these were all very time consuming.
My art table is currently in a state of disaster, and the floor space leading up to it is also a bit of a mine field. How was I even going to find the space to work, let alone the time to clean to get to the work surface.
The deadline ticked closer. This morning a post said midnight tonight.
I thought ooohhhh, I've participated every month since joining Id hate to miss, but I have no ideas.
Well the kids are listening to Arthur and the Invisibles, the little boy actor is the same kid in Spiderwick.
and I love those flower fairies in Spiderwick. I thought gee I can't make one of those and have it do them justice. Then I realized this isn't about copying something from a movie, its about being inspired.
I just happened to have bright yellow, pink and spring green in the top of my clay bag.
I decided to make a flower fairy inspired by the movie Spiderwick in my style of my muse pieces.
I will have this flower face up on etsy very soon, if not by the time you have read this.
Spiderwick face on etsy
PCAGOE monthly challenge, Voting starts August 1
Tuesday, May 20, 2008
Shifting to neutral
Or, what is that color anyway?
Its more grey than brown, and more brown than grey. It may lean a little toward green, but then again maybe its leaning toward purple. It definitely not grey because grey is a mix of black and white, this color seems to be some muddy mess including all colors, with out actually being a color. Its "color neutral." Some people call it taupe. This non-color- color comes in a limited range of shades, because once it gets too dark it is definitely a brown, and once too light it becomes a bisque/ivory tone.

Now with all of the wonderful colors available in polymer clay would anyone actually want to work in "color neutral?"
That’s simple, when the clay is a base for a surface treatment. Color neural won't cause any adverse effects to the treatment color, it just lies there and "takes it," and lets the surface treatment be focal. Then again, there are times you just need mud.
Shades of grey wont cut it for mud, and the shades of grey are infinite. Yes grey is a neutral, so is black and so is white. Black and white are extremes and will alter the surface treatment results.

Grey is the extreme neutral, but it can also be "flat" and "colorless." It's not so simple to get a basic 50% grey.
That’s a grey that is perfectly balanced between the light of white and the dark of black. The pigmentation in black is intense. Be prepared to need more white than black. Also, add little bits of the black to the white as you blend. This will help control the sheer quantity you blend, as well as give you better color control.
Color neutral has some color body to it, so its not as flat. Like grey they are many shades, but they are in a smaller range. There are a few commercial color neutrals available to purchase, but the real fun is in blending your own. This is a great way to use up any scrap you may have. The best neutral colors come from blending a bit of everything.
It helps to be familiar with your color wheel when blending a neutral color.

Colors that are opposite on the wheel, complimentary colors, not only do these colors look great together, but when they are blended together they cancel each other out. This is good to know so that when you blend your pile of scrap, and notice that your "neutral" is a bit too green, you can add a red based color to even it out.
Now that you have blended your neutral color what can you do with it?
I like my color neutral clay to be a base for colored mica pigments. The pigment colors really show thru with out seeming "neon" like they do when on a black clay base.

Its more grey than brown, and more brown than grey. It may lean a little toward green, but then again maybe its leaning toward purple. It definitely not grey because grey is a mix of black and white, this color seems to be some muddy mess including all colors, with out actually being a color. Its "color neutral." Some people call it taupe. This non-color- color comes in a limited range of shades, because once it gets too dark it is definitely a brown, and once too light it becomes a bisque/ivory tone.
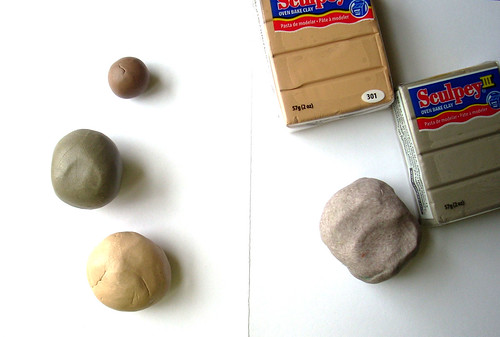
Now with all of the wonderful colors available in polymer clay would anyone actually want to work in "color neutral?"
That’s simple, when the clay is a base for a surface treatment. Color neural won't cause any adverse effects to the treatment color, it just lies there and "takes it," and lets the surface treatment be focal. Then again, there are times you just need mud.
Shades of grey wont cut it for mud, and the shades of grey are infinite. Yes grey is a neutral, so is black and so is white. Black and white are extremes and will alter the surface treatment results.
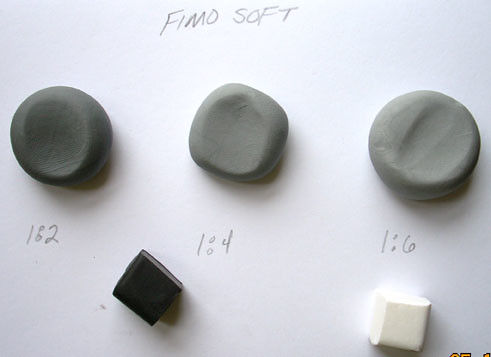
Grey is the extreme neutral, but it can also be "flat" and "colorless." It's not so simple to get a basic 50% grey.
That’s a grey that is perfectly balanced between the light of white and the dark of black. The pigmentation in black is intense. Be prepared to need more white than black. Also, add little bits of the black to the white as you blend. This will help control the sheer quantity you blend, as well as give you better color control.
Color neutral has some color body to it, so its not as flat. Like grey they are many shades, but they are in a smaller range. There are a few commercial color neutrals available to purchase, but the real fun is in blending your own. This is a great way to use up any scrap you may have. The best neutral colors come from blending a bit of everything.
It helps to be familiar with your color wheel when blending a neutral color.
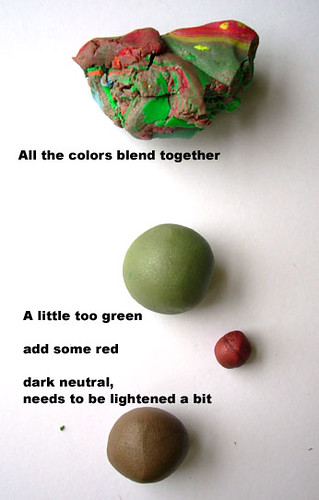
Colors that are opposite on the wheel, complimentary colors, not only do these colors look great together, but when they are blended together they cancel each other out. This is good to know so that when you blend your pile of scrap, and notice that your "neutral" is a bit too green, you can add a red based color to even it out.
Now that you have blended your neutral color what can you do with it?
I like my color neutral clay to be a base for colored mica pigments. The pigment colors really show thru with out seeming "neon" like they do when on a black clay base.
Thursday, March 13, 2008
the Polymer Clay collection
MY husband thinks if Ive gone this far to organize them I should set the drawer up chromatic order.
The damage was mostly done at the latest Michaels 99 cent block sale. I ended up going back 4 times.
It seems like a lot at first glance, but then when I use it I think, on no I've already used so much gold!
This doesn't look like a problem to you does it?


The damage was mostly done at the latest Michaels 99 cent block sale. I ended up going back 4 times.
It seems like a lot at first glance, but then when I use it I think, on no I've already used so much gold!
This doesn't look like a problem to you does it?
Subscribe to:
Posts (Atom)