I haven't participated in a PCAGOE challenge in a long time. I forgot how it helps with the creative process.
Any way, this month's theme is History. We have quite a variety of histories to choose from as well as creative projects.
My entry is #4 the set of medieval manuscript canes.
Voting will start in the next day or 2 over at www.pcagoe.com.
Vote, you could win something!
the "official" blurb:
The Polymer Clay Artists Guild of Etsy's May Challenge theme is "History/Historial Event". As you can see, 14 of our member artists took the challenge and created these gorgeous entries depicting and interpreting a moment in time. Some are playful and humorous, others are touching and evoke deeply emotional feelings. Some are very personal. All are awesome interpretations on the challenge theme, and we hope you will vote for your top 3 favorites beginning May 1 thorugh May 7, 2010 at www.pcagoe.com. 5 lucky voters chosen at random will also win fabulous polymer prizes handcrafted by our member artists!
Showing posts with label pcagoe. Show all posts
Showing posts with label pcagoe. Show all posts
Wednesday, April 28, 2010


Monday, April 26, 2010
Treasuries!
Etsy has this thing called Tresuries, it allows any Etsy user to create a curated selection of items. I have never been able to snag one. Even when they created Treasury West, which was supposed to just be an extra Treasuries collection. Well now the have Treasury East and ive managed to create 3--I dont think they are as limited server space wise.
So I created 3:
one of Blue Goddess nifty things

one specifically for the PCAGOE street team, its all polymer canes

And last one PIRATES!

If you have a chance visit them before they expire--I have no idea when that is
So I created 3:
one of Blue Goddess nifty things

one specifically for the PCAGOE street team, its all polymer canes

And last one PIRATES!

If you have a chance visit them before they expire--I have no idea when that is
Tuesday, June 2, 2009
Paisleys and dots

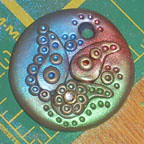
Applying color theory to creating a colorful paisley and dot pendant.
 Place a sandwich baggie smooth over the surface of the clay. Press into the clay, through the baggie, with a round cookie cutter-about 2 inches in diameter. The sandwich baggie makes a nice beveled edge to the cut shape.
 Using a small round Kemper punch cut out several small dots. Roll these into small balls. Using the small round punch, cut a hole into the top of the pendant base. Approximately 1/4 inch from the edge.
 Using a small tear drop shape cookie cutter, cut 3 shapes. Use your fingers to gently curve the tear drops into paisleys.
 Arrange the paisley shapes and dot balls in a pleasing arrangement. For smaller dots cut the punched dots in half.
 Place a hot set crystal on one of the larger dots as accent bling. Use the tip of a knitting needle to push accent dots into the centers of the clay dots, and along edges of shapes.
 Use color theory principles to help select pigment powder colors. Apply colors loosely with soft brush. Do not inhale the pigment particles, cover your mouth and nose, and use in a well ventilated area.

This pendant takes approximately 1/4 of a standard sized block of polymer clay. Using a neutral color, condition and roll out a section of clay. Roll your section on the second or third to largest setting of your pasta machine. (The largest for my machine is a 7-I rolled my clay at 5).
Fold the clay over on itself and lightly press together--doubling the thickness, and removing any air bubbles.
Place a sandwich baggie smooth over the surface of the clay. Press into the clay, through the baggie, with a round cookie cutter-about 2 inches in diameter. The sandwich baggie makes a nice beveled edge to the cut shape.Roll the remaining clay back thru the pasta machine, at the same setting. The remainder of the shapes will be cut from a single layer of the clay.
Using a small round Kemper punch cut out several small dots. Roll these into small balls. Using the small round punch, cut a hole into the top of the pendant base. Approximately 1/4 inch from the edge.Using a small tear drop shape cookie cutter, cut 3 shapes. Use your fingers to gently curve the tear drops into paisleys.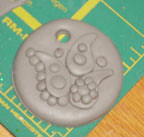 Arrange the paisley shapes and dot balls in a pleasing arrangement. For smaller dots cut the punched dots in half.Place a hot set crystal on one of the larger dots as accent bling. Use the tip of a knitting needle to push accent dots into the centers of the clay dots, and along edges of shapes.
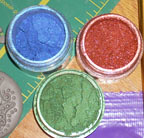 Use color theory principles to help select pigment powder colors. Apply colors loosely with soft brush. Do not inhale the pigment particles, cover your mouth and nose, and use in a well ventilated area.
Cure following the polymer clay brand's instructions. When cool brush off any excess pigment powders and coat with Varathane, or your polymerclay coating of choice to protect the mica pigment colors on your design.
Sunday, May 3, 2009
Color theory with mica pigment powders
Color theory is the study of mixing color and the visual impact of certain color combinations. There are many aspects to be taken into consideration when studying color. The form of the color —opaque pigment, translucent inks, transparent light—impact how colors interact and mix.
Mica pigment powders are ground natural mineral (mica) flakes coated with and oxide, usually titanium or iron. The granules of the flakes are solid and reflect light; therefore they are discussed in terms of opaque pigments.

There are three primary colors when dealing with opaque pigments: red, yellow, and blue. These are base, or pure colors. These colors, or hues, cannot be achieved through mixing.
Hue is the name of a color (red, purple). It's easy to remember: Hue and Hugh are both names. Hue is a color’s name, just as Hugh is a man’s name.
The three primary hues are the basis of the color wheel. Think of a rainbow in a circle, showing the range of hues that can be created when the primary colors are mixed. A basic color wheel shows primary and secondary hues. Secondary colors are achieved by mixing two primary colors.

Yellow+ red= orange
Red+ blue=violet
Blue+yellow=green
Tertiary, or intermediate, hues are the next level of color blends.

Green+blue=aquamarine
Analogous colors are hues that are next to each other along one side of the color wheel. Think of the colors as being in “rainbow order.”

Complementary colors are in opposite positions on a color wheel.

Blue-orange
Yellow-violet
Red-green
Split complementary hues are colors that are in opposite position on a color wheel, with one of the colors of the pair, shifted to the left or right

Aquamarine-orange
Indigo-yellow
Tints and shades are achieved by mixing a pure hue with white or black. Tints are lighter, and shades are darker. Tints can be achieved with mica pigments on clay by varying the quantity used. Both tints and shades can be achieved through blending pigments together.
There are many ways to help with the selection of color combinations. Magazines frequently will publish color pallets (a selection of hues) that they predict will be the season's popular colors, or are currently the popular colors. Keeping notes in your sketch book of color combinations you have seen and like, will help on future projects. Color choice is always going to be subjective, simply because different people favor certain hues over others.
Analogous colors are always pleasing combinations. An analogous range can be created with a “jump” or skip over a single color in the range.
To “jazz-up” a selection of analogous hues, add an accent color – such as in the example:
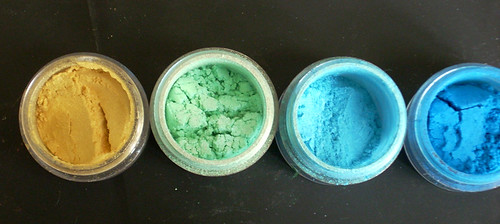
Yellow-aquamarine-blue (green was skipped)
Accent colors work well when they add contrast. A good way to achieve this is to select a complementary color.
Pure complementary colors can be a bit jarring—think of bright red and green together. A modified complementary combination can be quite pleasing. Using a combination of split complementary with tints of the hues create very successful combinations. Copper and turquoise are a good example of this: copper represents the orange hue and turquoise is a tint of the aquamarine hue.

When planning on using mica pigments, the clay body color needs to be taken into consideration. The hue of the clay body will impact the tint and intensity of the applied mica pigments. Colors will not appear as bright on white as they will on black. Using a neutral base will give a more subtle effect.

When using colored clay make pigment selections based on analogous hues. Using complementary hued pigments on colored clay will dull down the overall appearance. Interference, or color shift, pigments incorporate a bright accent hue- so the pigment seems to shimmer in a different color. Frequently the shift is to a complementary hue, or using a bright color on a colorless base. These are great for adding “jazz.” You need to pay attention to the shift color when using interference pigments. You don’t want to lose an exciting color shift by applying the pigment to a base clay the same color as the interference shift. Applying a color-less interference powder with a complementary color to a colored clay base will not dull the overall appearance but add the “oohhh aahh" effect.
Pigments can be blended to achieve almost any hue on the color wheel. Warning: when blending colors limit how many you use. Too many colors mixed together tend to end in a muddy color. Blending of complementary colors will also result in a mud color. Mica pigments are available commercially for the arts and crafts industry. Mica pigments make-up is also available, and can be used on polymer clay. Expanding into the world of powder and pressed powder eye shadow expands the range of hues and tints available. There are so many hues available it's almost not necessary to every need to blend pigments.
Always use mica powders safely. Use in a well ventilated area, and protect your lungs by wearing a face mask. Mica pigments are made from minerals and oxides, not something you want to inhale.
Mica pigment powders are ground natural mineral (mica) flakes coated with and oxide, usually titanium or iron. The granules of the flakes are solid and reflect light; therefore they are discussed in terms of opaque pigments.
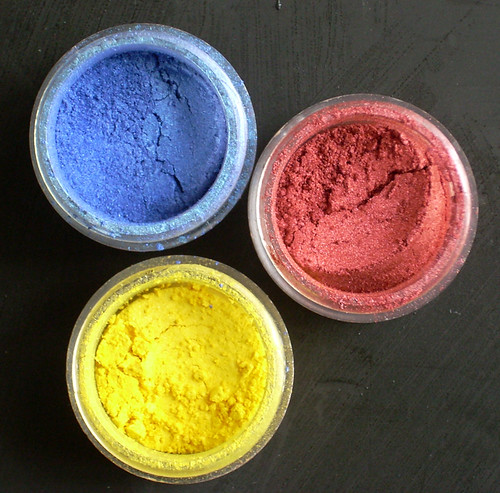
There are three primary colors when dealing with opaque pigments: red, yellow, and blue. These are base, or pure colors. These colors, or hues, cannot be achieved through mixing.
Hue is the name of a color (red, purple). It's easy to remember: Hue and Hugh are both names. Hue is a color’s name, just as Hugh is a man’s name.
The three primary hues are the basis of the color wheel. Think of a rainbow in a circle, showing the range of hues that can be created when the primary colors are mixed. A basic color wheel shows primary and secondary hues. Secondary colors are achieved by mixing two primary colors.
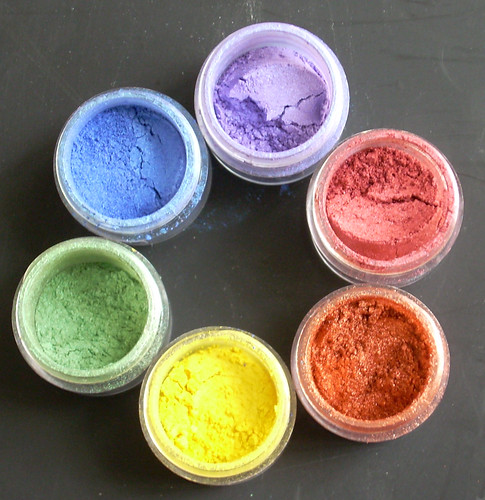
Yellow+ red= orange
Red+ blue=violet
Blue+yellow=green
Tertiary, or intermediate, hues are the next level of color blends.

Green+blue=aquamarine
Analogous colors are hues that are next to each other along one side of the color wheel. Think of the colors as being in “rainbow order.”
Complementary colors are in opposite positions on a color wheel.
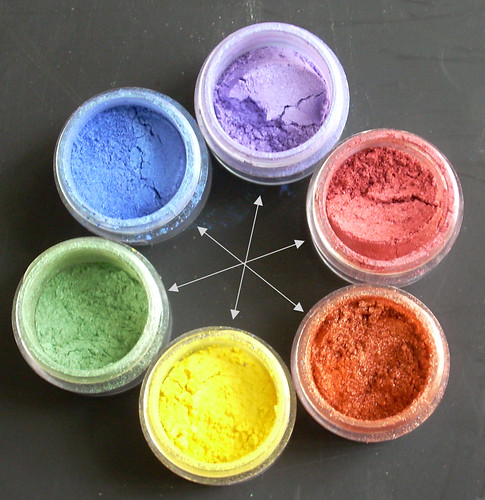
Blue-orange
Yellow-violet
Red-green
Split complementary hues are colors that are in opposite position on a color wheel, with one of the colors of the pair, shifted to the left or right

Aquamarine-orange
Indigo-yellow
Tints and shades are achieved by mixing a pure hue with white or black. Tints are lighter, and shades are darker. Tints can be achieved with mica pigments on clay by varying the quantity used. Both tints and shades can be achieved through blending pigments together.
There are many ways to help with the selection of color combinations. Magazines frequently will publish color pallets (a selection of hues) that they predict will be the season's popular colors, or are currently the popular colors. Keeping notes in your sketch book of color combinations you have seen and like, will help on future projects. Color choice is always going to be subjective, simply because different people favor certain hues over others.
Analogous colors are always pleasing combinations. An analogous range can be created with a “jump” or skip over a single color in the range.
To “jazz-up” a selection of analogous hues, add an accent color – such as in the example:
Yellow-aquamarine-blue (green was skipped)
Accent colors work well when they add contrast. A good way to achieve this is to select a complementary color.
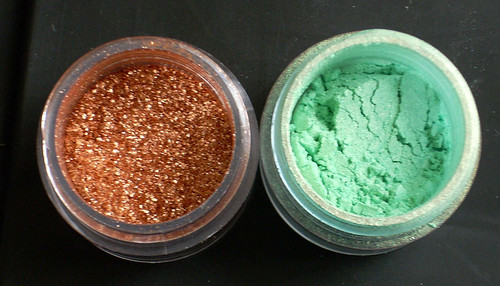
Pure complementary colors can be a bit jarring—think of bright red and green together. A modified complementary combination can be quite pleasing. Using a combination of split complementary with tints of the hues create very successful combinations. Copper and turquoise are a good example of this: copper represents the orange hue and turquoise is a tint of the aquamarine hue.
When planning on using mica pigments, the clay body color needs to be taken into consideration. The hue of the clay body will impact the tint and intensity of the applied mica pigments. Colors will not appear as bright on white as they will on black. Using a neutral base will give a more subtle effect.
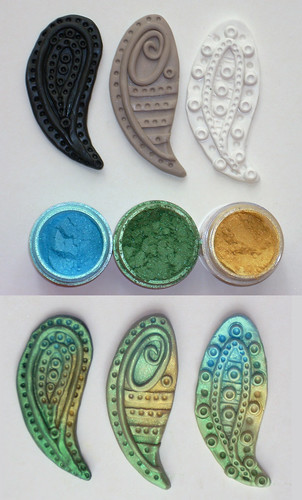
When using colored clay make pigment selections based on analogous hues. Using complementary hued pigments on colored clay will dull down the overall appearance. Interference, or color shift, pigments incorporate a bright accent hue- so the pigment seems to shimmer in a different color. Frequently the shift is to a complementary hue, or using a bright color on a colorless base. These are great for adding “jazz.” You need to pay attention to the shift color when using interference pigments. You don’t want to lose an exciting color shift by applying the pigment to a base clay the same color as the interference shift. Applying a color-less interference powder with a complementary color to a colored clay base will not dull the overall appearance but add the “oohhh aahh" effect.
Pigments can be blended to achieve almost any hue on the color wheel. Warning: when blending colors limit how many you use. Too many colors mixed together tend to end in a muddy color. Blending of complementary colors will also result in a mud color. Mica pigments are available commercially for the arts and crafts industry. Mica pigments make-up is also available, and can be used on polymer clay. Expanding into the world of powder and pressed powder eye shadow expands the range of hues and tints available. There are so many hues available it's almost not necessary to every need to blend pigments.
Always use mica powders safely. Use in a well ventilated area, and protect your lungs by wearing a face mask. Mica pigments are made from minerals and oxides, not something you want to inhale.
Friday, March 6, 2009
BEADS!
Ok so I have been obsessing about beads. Making them. I went to a little bead and gem show and there was this nice lady there who spend a lot of time with myself and my daughter, explaining things to the kid. Of course kid was just being a sponge and soaking in all kinds of information. The lady was selling these things called inside out beads. They were fascinating. Not quite cane work in polymer but similar. We bought some of her lovely beads. At home I spent 4 hours figuring them out!
So now Ive been playing with making beads. These samples of mine arent even my best ones--just the ones I have a photo of! lol!
I went searching to see what others are doing bead creation-wise.
There is some very beautiful work out there for the buying!

SarajaneHelm.etsy.com
This set of beads has a nice spring like quality with out the pollen.


heres another nifty set of beads. I love the swirlies! Im still developing the skills to do the swirly shape--its not as easy to get a really good and clean swirl as they make it look. These are by oneandonly.etsy.com
Friday, February 27, 2009
Canes!
So I have placed my first set of raw polymer clay canes for sale on etsy.
There are quite a few artists who do this.
Of course my canes don't look like theirs--thats good, that way we aren't competing for the same artists. I know there are artists out there for my canes.
These are some nice ones I found while checking out the viability of actually posting raw canes.
BreathtakingBeadzz.etsy.com
she makes some lovely floral and butterfly canes. Her finished beads are beautifully feminine

Beadopolis.etsy.com
There isnt much in this shop yet, but Wes, has gotten cane making down to a science!
hes posted it on his blog
http://caninable.blogspot.com/2009/01/cane-reduction-beado-bunge4000.html

yonatdascalu.etsy.com also has some lovely canes. I like this purple spiral.

Thursday, February 26, 2009
Medaevil manuscript cane set
This set of 4 canes are all based on pieces/design elements that you could find in medaevil illuminated manuscripts. I took a class to the museum to see an exibit, and I fell in love with the little detail work in the illuminations. I decided I needed to try to make that in clay. There is a simple gold dot, a small fleur de lis on a dark pearl blue back ground, and celtic knot, and a colorful floral design. All 4 canes are made from Sculpey III, and they all use the same colors. They were designed to be used together.
Thgis is my entry for the March PCAGOE challenge. To see other entry pieces, and to vote on your favorite visit http://www.pcagoe.com

Thgis is my entry for the March PCAGOE challenge. To see other entry pieces, and to vote on your favorite visit http://www.pcagoe.com
Friday, February 6, 2009
PCAGOE Cupid Hunt

The members of PCAGOE, the Polymer Clay Artist Guild of Etsy, are sponsoring a Valentine Scavenger Hunt. To participate simply visit participating shops beginning February 6th 2009 and continuing until midnight EST on February 12, 2009, and find the hidden Valentine!
When you find the Valentine in a shop, convo the seller through etsy with the URL of the listing where the image is hidden, or the transaction number for the Item. You may enter once per participating shop.
That’s it! You must be a registered Etsy user to qualify, so if you have not already registered, please take a moment to do so, and you can join in our fun! Registering is fast and easy.
On February 14, 2009, the each seller will draw a winner at random using a random generator.
Here is a list of the other member shops participating in the hunt. Every member is offering a different prize!
tejaesart: polymer clay heart
SCDiva: $25 gift certificate (also valid at PCDiva)
DivaDea: a little love wall art
lynnslittlecreations: it’s a surprise!
SilverGate: two heart magnets
PuppyKissPortraits: Valentine kisses pendant
juliespace: $10 gift certificate
jkollmann: earrings
irismishly: set of four heart beads
ashpaints: 50% off one item
zoeowyn: paisley heart pendant
peggers: $20 gift certificate
beetreebyme: 20% off one order
polyclarific: a surprise pendant
angeli: chocolate truffle pendant
LaurelSteven: heart pendant
revonav: $50 gift certificate
links to all the shops can be found at PCAGOE.com
or you can start the search at my shop at zoeowyn.etsy.com and link to the other shops from there
Saturday, January 24, 2009
Art Cards
Im not a big art card maker. But I do try, and they are this months challenge in PCAGOE, and I do try to participate in the ones that are a challenge to me. I find the challenges help push me out of my comfort zone, making it larger.
So, I made art cards.
The top winged heart, and the filagree heart under that one both burned. I was bummed. later I decided to white wash them, instead of doiing a darker antiquing the way I usually do. I must say i was surprized. The white wash gave the cards a nice shabby chic look.
The mica powdered covered heart was my next attempt. Its not finished. It may never be finished. See all those lumps and bumps? Well, it boiled up during the curing process. I guess my toaster oven in the garage in the middle of winter is not such a good idea, it obviously could not maintain a constant temp, and most likely had temp spikes. Oh well. The hubby said sell it anyway no one will know. Doink--I will! He can be kinda thick sometiimes!
The last one is my attempt at steam punk. I think it turned out a bit more industrial than steam punk, but Im on my way. It is the card I selected as my entry piece for the challenge.
The challenge will be up and available for voting next week at http://www.pcagoe.com
Thursday, August 7, 2008
I like this idea!

this is a component clay cane.
As in its ment to be used as part of some thing, its an enhancement instead of the star.
Most canes I see for sale are the star.
Whenever I think about selling canes they are stars. --I dont mean a literal star I mean the focal piece.
Good idea!
this is by Valleycreations.etsy.com
And its currently on sale
Wednesday, August 6, 2008
Interesting techniques in polymer clay

this piece is made from a carved mold
its by arzumusa.etsy.com

Its a carved egg, the exact hows I am rather clueless on, but it certainly is interesting from folkartfromtheheart.etsy.com

this looks like stained glass to me by CookiesCreations.etsy.com
Tuesday, August 5, 2008
She won!


Im so excited to announce that my Spiderwick Fairy tied for second place in the monthly PCAGOE challenge. She tied with an adorable little Phantom of the Opera robot by ittybittiesforyou, who I look at and think its a mini metal Gerard Butler! (he played the roll in the movie)
A great Harry Potter movie poster by ametista won first place.
I would have voted for it myself.
Wining entries can be found at
http://www.pcagoe.com
Wednesday, July 30, 2008
PCAGOE monthly challenge
"Its Show Time"
This months challenge was based on TV or Movies we love.
This months challenge for me was time and space related.
I have entirely too many movies that I LOVE I couldn't think of anything that I could do in a timely fashion. I kept thinking what what what.
ideas that surfaced included Highlander, 1001 Arabian Nights, 300, The Mummy, Eragon. All the ideas that stemmed from these were all very time consuming.
My art table is currently in a state of disaster, and the floor space leading up to it is also a bit of a mine field. How was I even going to find the space to work, let alone the time to clean to get to the work surface.
The deadline ticked closer. This morning a post said midnight tonight.
I thought ooohhhh, I've participated every month since joining Id hate to miss, but I have no ideas.
Well the kids are listening to Arthur and the Invisibles, the little boy actor is the same kid in Spiderwick.
and I love those flower fairies in Spiderwick. I thought gee I can't make one of those and have it do them justice. Then I realized this isn't about copying something from a movie, its about being inspired.
I just happened to have bright yellow, pink and spring green in the top of my clay bag.
I decided to make a flower fairy inspired by the movie Spiderwick in my style of my muse pieces.
I will have this flower face up on etsy very soon, if not by the time you have read this.
Spiderwick face on etsy
PCAGOE monthly challenge, Voting starts August 1
Saturday, July 12, 2008
Things I've learned the hard way
2 weeks ago I took a wire wrapping with Dale Cougar Armstrong. We made sculpted wrapped pendants. During break I found this great oversized "diamond" and decided that it was perfectly ostentatious and needed to be wrapped in brass --gold would have been, well too costly and frankly just not tacky enough. After all this diamond is a paper weight and over 2 inches in the round.
Well I wrapped it up . It sucked. I went too fast. I need to learn to slow down ad be more controlled and precises with my work. Tihis is an on going lesson I seem to constantly need to learn and re-learn.
So I pulled it apart and rewrapped the loverly stone. I used loads of wire. A also learned do NOT mix your wire wire hardnesses.
This is wrapped using square and round wire. It makes for a visual difference in texture--ok subtle but its there. But the problem in the round wire was deaad soft and the square half hard. Man this was a bit*h to wrap. First of all DAle did warn us against doing this in half hard wire, but then I had to go and mix my hardnesses.
what a control issue that was
not again
or if again I at least KNOW what Im setting my self up for right?
Anothe lesson I learned the hard way was not to cure dimentional objects in my little toaster over, that i used exclusively for polymer clay.
I fired the head off of a dragon box.
Ruined.
Poor beastie, no head.
Fortunately I was able to give him a new head.
Its one of the few dragon boxes i've ever sold.

I also discovered after quite a bit of work on this one bottle, that the cobalt blue glass bottles from Micheals are in fact not blue glass but plastic coated glass. No wonder when i was washing and wiping this dragon down with alchohol the bottle color looked like it was changing. It was! (no more blue bottles for me)

Well I wrapped it up . It sucked. I went too fast. I need to learn to slow down ad be more controlled and precises with my work. Tihis is an on going lesson I seem to constantly need to learn and re-learn.
So I pulled it apart and rewrapped the loverly stone. I used loads of wire. A also learned do NOT mix your wire wire hardnesses.
This is wrapped using square and round wire. It makes for a visual difference in texture--ok subtle but its there. But the problem in the round wire was deaad soft and the square half hard. Man this was a bit*h to wrap. First of all DAle did warn us against doing this in half hard wire, but then I had to go and mix my hardnesses.
what a control issue that was
not again
or if again I at least KNOW what Im setting my self up for right?
Anothe lesson I learned the hard way was not to cure dimentional objects in my little toaster over, that i used exclusively for polymer clay.
I fired the head off of a dragon box.
Ruined.
Poor beastie, no head.
Fortunately I was able to give him a new head.
Its one of the few dragon boxes i've ever sold.
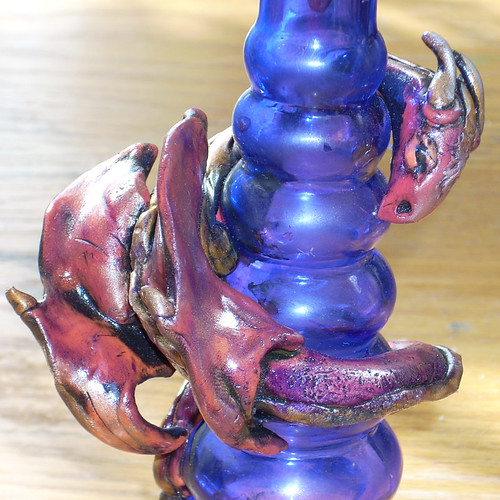
I also discovered after quite a bit of work on this one bottle, that the cobalt blue glass bottles from Micheals are in fact not blue glass but plastic coated glass. No wonder when i was washing and wiping this dragon down with alchohol the bottle color looked like it was changing. It was! (no more blue bottles for me)
Thursday, April 10, 2008
unplanned collaboration

I was in need of some waves for my mermaid. I participated in a bead swap on the Polymer Clay Artists Guild of Etsy.
My last set of beads arrived today. They are by Papernclay.
they are not only little swirly waves BUT the combination of the background I covered my box top in an hour before they arrived AND the back ground color from my mermaid cane.
They couldn't have been more perfect if I ordered them!
Tuesday, April 1, 2008
Egg voting time

Its the Polymer Clat Artists of Etsy Guild Challenge time!
Im still recovering from the impact of this challenge:
Cover an egg
oye!
All the entries are in
you have only a few days to vote for your favorite!
(Pssst: I'm entry #17)
http://pcagoe.com/
Thursday, March 13, 2008
the Polymer Clay collection
MY husband thinks if Ive gone this far to organize them I should set the drawer up chromatic order.
The damage was mostly done at the latest Michaels 99 cent block sale. I ended up going back 4 times.
It seems like a lot at first glance, but then when I use it I think, on no I've already used so much gold!
This doesn't look like a problem to you does it?

The damage was mostly done at the latest Michaels 99 cent block sale. I ended up going back 4 times.
It seems like a lot at first glance, but then when I use it I think, on no I've already used so much gold!
This doesn't look like a problem to you does it?
Wednesday, March 12, 2008
Im not allowed to work alone
Ever.
Whenever I start to "work" in clay it becomes a family affair. I have even gone as far as getting the kids their own clay supplies, since they usually want the ones I am currently using! I have a "clay bag" that is free access clay. They are encouraged to use their personal supplies first, but inevitably they NEED the color I am using, so they can get it from the clay bag.
If they don't want to do any work they have to sit in my lap. I work with sharp knives so they have learned to sit next to me, unfortunately they still lean on me, fortunately they love me, and want to be with be, and think its really cool that I make stuff with clay and they get to use mommy's tools (but not the really sharp blades).


Whenever I start to "work" in clay it becomes a family affair. I have even gone as far as getting the kids their own clay supplies, since they usually want the ones I am currently using! I have a "clay bag" that is free access clay. They are encouraged to use their personal supplies first, but inevitably they NEED the color I am using, so they can get it from the clay bag.
If they don't want to do any work they have to sit in my lap. I work with sharp knives so they have learned to sit next to me, unfortunately they still lean on me, fortunately they love me, and want to be with be, and think its really cool that I make stuff with clay and they get to use mommy's tools (but not the really sharp blades).
Thursday, March 6, 2008
Swim swim swimmy

I jumped on the band wagon and decided to participate in the etsy swimmy project. I took some pics with a cheap point and shoot to show the work process.
Well the first step truly was to "drink" the kool-aid and join the cult. A-hem, decide to participate. I printed the template that etsy provided, and thus began the process.
I decided to use polymer clay as my media for my entry, since PMC would be cost prohibitive, and I wasn't "feeling the love" for a collage.

+ Step one, select a collection of gold-ish colored clays. I use Fimo, Sculpy and Premo. I usually go for color over brand. In this case I went with color plus what I already had open.

+ Blend the heck out of them with the pasta maker.
Now, I dint usually go for smooth skinner-esque blends, I like my blends a little more organic, so its not all pasta machine, here in the blending process, there is some hand blending involved.

+ I rolled out a nice slab of clay on the thickest setting of the pasta machine, and then traced the template on to the clay. next step is to cut out the fish following the template. And start making lots and lots of snakes in the left over clay.

+ I like to incorporate jewels and beads and the like in my polymer clay creations. One om my favorite ways to add big shiny bits are glass baubles. I selected and placed the chosen glass baubles for the fish. I used a blue one for the eye, opaque orange for the fins and transparent swirly orange for the rest of the "scales."

+ The building of the fins was using straight snakes, and the scales were built with swirls and dots to lock in the glass baubles.
+ The fish was cured in my little toaster oven for 35 minutes at 265 degrees.


+ After the clay was cured I added an antique finish by applying a mix of acrylic paints. I used navy and green. I usually use some compination of brown, navy, purple, and black. I painted the fish thoroughly. After the paint began to dry, I began the cleaning process. First I started by wiping the paint off with a dry paper towel, followed by a damp paper towel, followed by a Mr Clean Magic Eraser. After the paint was completely dry, I used an old dental tool to scrape and clean paint from the glass surfaces.
+ The fish was sealed and polished with Sculpy glaze.
I sent the fish on its merry way after I had some better pictures taken by my friend and her swank camera.
Subscribe to:
Posts (Atom)