Pages

Showing posts with label art. Show all posts

Thursday, April 22, 2010

The Hat


I have been mildly obsessed with the Mad Hatter's hat from Tim Burton's Alice in Wonderland. Im not exactly certain why. I have also been fascinated with the mini victorian style top hats, and how they really work in Steampunk fashion.

So where did it all start? Well I am a fan of Tim Burton's movies. Simple, easy, to the point. I admire Johnny Depp as an actor, no he's not hard to look at but I actually do not have a movie star crush on him.
And well, I believe Tim owes me some royalty fees for using my hair. Oh yeah, thats my hair alright, down to the color.

And well if its my hair, then its a natural to think I should be that Mad Hatter for some costuming event (no I don't have a specific event). But Im not a boy, and I don't want to dress as a boy; no I want to do a girlie version. So naturally the feminine mini hat seemed like a "oh why not." Gives me something else to try to make.

I am soooo not a hat maker, I have tried, and I understand why they cost what they cost. But I still wanted to make that hat. Out of clay! So I have been working out in my head for just over a month how to construct a hat in polymer clay. I have 3 designs I want to try out. Will I make more after that? Don't really know, lets see how these 3 go first.

I finally was able to spend some quality time working on the hat. I made my pattern, modified it a bit and remade the pattern. Then I cut the pattern out of screen door mesh. Then I cut it out of clay. The assembly required some curing of bits before assembly, and super glue to help. Along with some strategically placed wads of paper for curing support.

So far I have 5 curing rounds, I have a few tweaks to do so there is at least one more cure. The hat as pictured is not quite finished, there are some details that need to be finished, like the hat pins across the front, and the tag needs the 10/6 written on it. its "lined" in orange, because I wasn't sure I was going to actually do this hat at the time, but I like it. I'm pleased with how it has turned out. I will finish it up in the next day or two, and do a trial run on actually wearing it; its heavier than I had originally thought it would be, so I am thinking I should try out the featherlight sculpy product--that stays light even after curing--for some base construction.

The pictures: in progress, you can see the mesh; assorted views

Tuesday, January 5, 2010

Starting of the year right!


Thought for the New Year ... if you are not living your passion ... Use the Blue Moon energy to help you with a new beginning.... "Find your passion. Look into the volcano-the fire, the lava of your Soul. The part that burns insistently and urges you to look at it. It is there that you find your answers and your true joy."

I can hardly believe I haven't had any artistic worthy posts since September--ouch.
Well I am starting off 2010 with the mojo focused in the right direction. I began this year prototyping!
Back in May I had these Easter egg ornaments and had no idea what to do with them. Stumble and trip and I ended up turning them into acorns.
Of course I thought these were the bees knees as it were. I ended up converting all of my glass egg shaped ornaments into acorns. I then took a back of styrofoam Easter egg shapes and turned all of them into  acorns. My colors began to deviate from "natural" acorn colors into fun fantasy colors, purples and pinks.


During the curing process I discovered that the styrofoam shrank. And caused the acorns with this as a base to crack. Hubby too k a purple cracked acorn and began to play with it, mostly trying to get the styrofoam out at first, then he thought this would make a great fairy house.
I have mentally been trying to figure out a good acorn base to make houses. You see the styrofoam really wasn't a smart thing to cook in the oven, and I only learned about that after the fact. That and I didn't want to constantly have to fix cracked acorns, because I used the wrong materials.


The first acorn fairy house, 
this one had the styrofoam base.


I thought about using that potato starch packing material, after all its potato starch it should be ok to cook, and it dissolves. 
I tried to mold and egg shape by hand. Ok that was a mess. Then I tried to use a plastic easter egg as a mold. It took a lot more of the packing material than I thought it would, it was very dense and heavy. And it did not keep its shape. In the end it required too much polymer clay, and the acorn turned out distorted and too heavy. And yes it does dissolve, but not before creating a gooey mess.

potato starch base acorn


Then I thought well, if I can used the plastic egg as a mold why not use the plastic egg as base. After all I use it as the base for other projects. So I tried that. and it worked beautifully. It actually cut easier that the thick wall of polymer I had created for the the potato starch based acorn.

The next step is to develop a tutorial for the fairy houses. I have worked one up for the plain acorn. Debating if I should submit it to Polymer Cafe, or go direct to online tutorial down load with claylessons.com.

Thursday, August 13, 2009

Discussing Steampunk


Originally uploaded by Zoeowyn
I will be discussing Steampunk with Mitzi on Bead Java Saturday August 15, 9 pm central. On Blogtalkradio


http://www.blogtalkradio.com/Bead-Java/2009/08/16/Bead-Java-Your-Hot-Forum-For-Hand-Crafted-Jewelry

Sunday, May 3, 2009

Color theory with mica pigment powders

Color theory is the study of mixing color and the visual impact of certain color combinations. There are many aspects to be taken into consideration when studying color. The form of the color —opaque pigment, translucent inks, transparent light—impact how colors interact and mix.

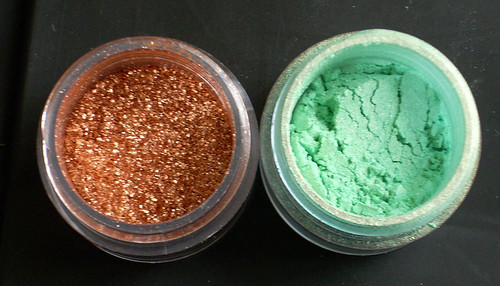
Mica pigment powders are ground natural mineral (mica) flakes coated with and oxide, usually titanium or iron. The granules of the flakes are solid and reflect light; therefore they are discussed in terms of opaque pigments.


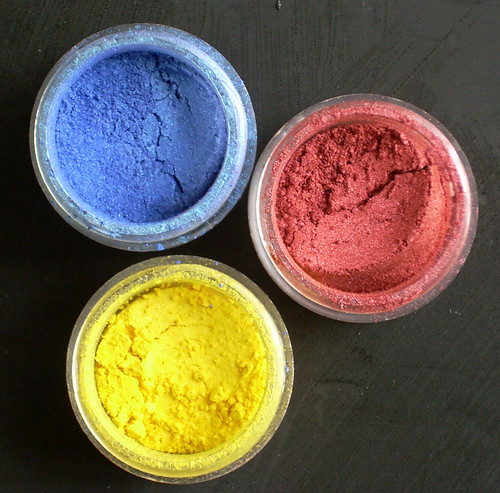
There are three primary colors when dealing with opaque pigments: red, yellow, and blue. These are base, or pure colors. These colors, or hues, cannot be achieved through mixing.


Hue is the name of a color (red, purple). It's easy to remember: Hue and Hugh are both names. Hue is a color’s name, just as Hugh is a man’s name.


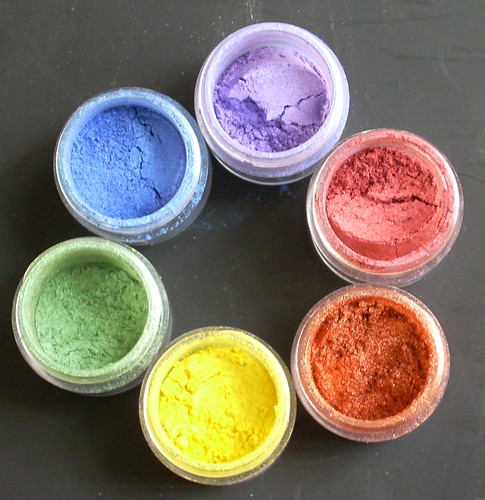
The three primary hues are the basis of the color wheel. Think of a rainbow in a circle, showing the range of hues that can be created when the primary colors are mixed. A basic color wheel shows primary and secondary hues. Secondary colors are achieved by mixing two primary colors.


Yellow+ red= orange
Red+ blue=violet
Blue+yellow=green


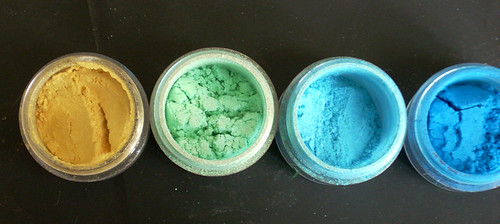
Tertiary, or intermediate, hues are the next level of color blends.


Green+blue=aquamarine


Analogous colors are hues that are next to each other along one side of the color wheel. Think of the colors as being in “rainbow order.”


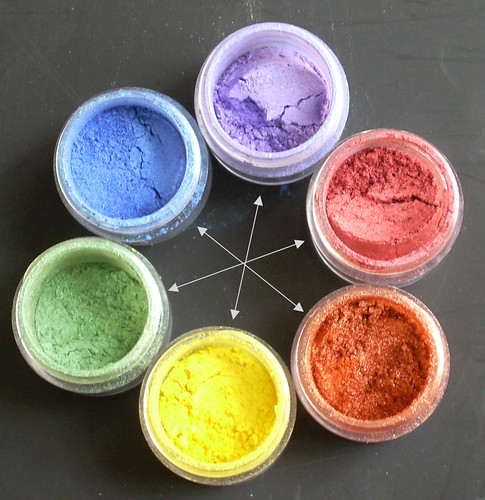
Complementary colors are in opposite positions on a color wheel.


Blue-orange

Yellow-violet

Red-green


Split complementary hues are colors that are in opposite position on a color wheel, with one of the colors of the pair, shifted to the left or right


Aquamarine-orange

Indigo-yellow


Tints and shades are achieved by mixing a pure hue with white or black. Tints are lighter, and shades are darker. Tints can be achieved with mica pigments on clay by varying the quantity used. Both tints and shades can be achieved through blending pigments together.

There are many ways to help with the selection of color combinations. Magazines frequently will publish color pallets (a selection of hues) that they predict will be the season's popular colors, or are currently the popular colors. Keeping notes in your sketch book of color combinations you have seen and like, will help on future projects. Color choice is always going to be subjective, simply because different people favor certain hues over others.

Analogous colors are always pleasing combinations. An analogous range can be created with a “jump” or skip over a single color in the range.

To “jazz-up” a selection of analogous hues, add an accent color – such as in the example:

Yellow-aquamarine-blue (green was skipped)


Accent colors work well when they add contrast. A good way to achieve this is to select a complementary color.

Pure complementary colors can be a bit jarring—think of bright red and green together. A modified complementary combination can be quite pleasing. Using a combination of split complementary with tints of the hues create very successful combinations. Copper and turquoise are a good example of this: copper represents the orange hue and turquoise is a tint of the aquamarine hue.


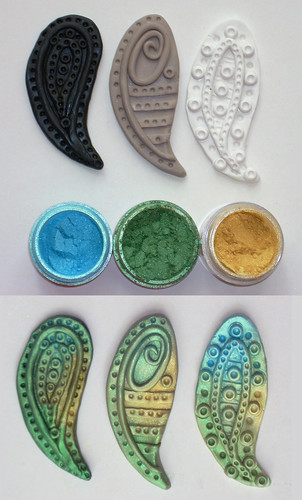
When planning on using mica pigments, the clay body color needs to be taken into consideration. The hue of the clay body will impact the tint and intensity of the applied mica pigments. Colors will not appear as bright on white as they will on black. Using a neutral base will give a more subtle effect.


When using colored clay make pigment selections based on analogous hues. Using complementary hued pigments on colored clay will dull down the overall appearance. Interference, or color shift, pigments incorporate a bright accent hue- so the pigment seems to shimmer in a different color. Frequently the shift is to a complementary hue, or using a bright color on a colorless base. These are great for adding “jazz.” You need to pay attention to the shift color when using interference pigments. You don’t want to lose an exciting color shift by applying the pigment to a base clay the same color as the interference shift. Applying a color-less interference powder with a complementary color to a colored clay base will not dull the overall appearance but add the “oohhh aahh" effect.

Pigments can be blended to achieve almost any hue on the color wheel. Warning: when blending colors limit how many you use. Too many colors mixed together tend to end in a muddy color. Blending of complementary colors will also result in a mud color. Mica pigments are available commercially for the arts and crafts industry. Mica pigments make-up is also available, and can be used on polymer clay. Expanding into the world of powder and pressed powder eye shadow expands the range of hues and tints available. There are so many hues available it's almost not necessary to every need to blend pigments.

Always use mica powders safely. Use in a well ventilated area, and protect your lungs by wearing a face mask. Mica pigments are made from minerals and oxides, not something you want to inhale.

Saturday, January 24, 2009

Art Cards


4 ACEO
Originally uploaded by Zoeowyn
Im not a big art card maker. But I do try, and they are this months challenge in PCAGOE, and I do try to participate in the ones that are a challenge to me. I find the challenges help push me out of my comfort zone, making it larger.
So, I made art cards.
The top winged heart, and the filagree heart under that one both burned. I was bummed. later I decided to white wash them, instead of doiing a darker antiquing the way I usually do. I must say i was surprized. The white wash gave the cards a nice shabby chic look.
The mica powdered covered heart was my next attempt. Its not finished. It may never be finished. See all those lumps and bumps? Well, it boiled up during the curing process. I guess my toaster oven in the garage in the middle of winter is not such a good idea, it obviously could not maintain a constant temp, and most likely had temp spikes. Oh well. The hubby said sell it anyway no one will know. Doink--I will! He can be kinda thick sometiimes!
The last one is my attempt at steam punk. I think it turned out a bit more industrial than steam punk, but Im on my way. It is the card I selected as my entry piece for the challenge.

The challenge will be up and available for voting next week at http://www.pcagoe.com

Wednesday, December 17, 2008

Bronze Pig, the art of Jill Johansen


I stumbled upon this image.. I think it is so beautiful, and what an amazing idea a Koi Mermaid.
She was done by Jill Johansen, a Canadian artist.
Her website is Bronze Pig, and you can purchase her designs on items at Cafe Press at http://www.cafepress.com/bronzepig/

I dont know Jill from Adam, as the saying goes, but I find her variety and subject matter interesting. Interesting, as in , Yes I like, not "oh thats interesting" I just dont know how to say thats not to my tastes. And I really like the variety of her artistic stylizations.

Thumbs up to Jill, she does truely beautiful work.

Now I just have to get my cafe cash account straightened up, and Im gonna buy something!

Monday, December 8, 2008

New CafePress Store


I opened a new CafePress shop.

http://www.cafepress.com/hazketchup

it was inspired by my friend's daughters obsessive love for ketchup. For her birthday we made her some cute little customized t-shirts.
Well they were such a hit when she wears them, I decided to put them on cafepress.

enjoy

Thursday, August 7, 2008

Its time to prepare for the holidays!


So were were at dinner the other night and the restaurant has a gift shop attached and...
I am amazed at all the Christmas and Halloeewn and Thanksgiving stuff already out. I mean it is only the first week of August.
Then again as a kid my crafty aunt always had X-mas gifts made, done and wrapped before September.
And now here I am thinking gee should I make some holoiday appropriate items?
Im not in a halloween mood and yet it probably is halloween product time.
And I should probably be thinking about X-mas products and presents as well.
Im not too good about this being ahead of the craft market for product, but I guess its time I did some preplanning.
I wonder what I should do?
I know I have a slew of Day-of-the-Dead items I want to make
and I should start planning out some potential Christmas craft classes, as well as make some ornaments.
I dont want to be the Christmas shop, as I am a die-hard 12 days of X-mas fan, and I dont like seeing all the lights go up before Thanksgiving. by the time the day comes around Im ready to be done, and Id rather be ready to get started, with the end party on twelfth night, but thats just me. Maybe a few Santa pins wont be too horrible.
Now as far as the halloween stuff....
I want my stuff to be seasonally appropriate, but not limited to the season
Valentines day is good for that, I mean hearts are good all the time, they dont have to be red and rosey to be a heart
ooh maybe I could that, holiday hearts...
ooh idea is a brewing.....

Tuesday, March 25, 2008

my thing-a-day for february


more thing a day projects
Originally uploaded by Zoeowyn

The plan was to join the thing-a-day for February, of course I had a mental laps, and did not sign up in time. I still wanted to go for it, so I did. I kept track along with a few other crafty folks over on tribe, as we conducted our own unofficial thing a day.

I have photos of some, and not of others, here goes my list of February's thing-a-day


Feb 1 • I made a body stocking
its shiny and purple
Feb 2 • I worked on my altered collage box, painted a Hamsa
Feb 3 • the kid and I made her habitat dioramas of an African savanna, we poked grass into styrofoam blocks, glued it the front, modge-podged the definitions on the outside of the box, and modge-podged a photo wrapped around on the inside of the box
Feb 4 • design and start carving a hamsa print block

Feb 5 • I ended up getting a bit carried away with the hands and drew a bunch more
Feb 6 • I fixed a bracelets link, I collected the stuff for my belly dancer altered box and cleaned off the table in the art room so I can use it for art.
Feb 7 • I finished the hamsa block print
Feb 8 • a friend and the kids and I made heart crayons (see earlier blog)
Feb 9 • We made more crayons
Feb 10 • I painted the edges of a painting that I need to finish
Feb 11 • I painted a second layer and taped the sides of a canvas
Feb 12 • I finished the striping and black detail work on that canvas and one other one
Feb 13 • I finished painting the sides, and did the eye details,
I actually finished and signed one of them!
Feb 14 • I ended up taking pictures to post, and some doodling
Feb 15 • I started my Swimmy etsy fish project (see earlier blog)
Feb 16 • I "moved" into my clay bag and taught a friend how to make scrap cats
Feb 17 • I finished the fish

Feb 18 • I finally got to use the hamsa block I carved, and I made some gift cards
Feb 19 • I posted process images of the fish I did for etsy, the pics were crap, but I posted them anyway on flickr
Feb 20 • I got a good pic of the fish and made a lizard on a rock, and some plant life fimo
Feb 21 • I baked the creations from yesterday, made some more Hamsa cards, sewed the "'first draft" of a dance costume, tomorrow I make the revisions to the outfit so its dance-able for Saturday
Feb 22 • Finished dance costume
Feb 23 • Performance Art! Performed in the costume
Feb 24 • made and burned a little hamsa pendant
Feb 25 • had flu but still made a hamsa pendant
Feb 26 • had flu worked on mermaid cane
Feb 27 • made a dragon bottle, and a scrap dragon
Feb 28 • shopped for cake decoration supplies worked on mermaid cane
Feb 29 • worked on mermaid cane

Finished the mermaid cane on the 2nd, posting its picture here as well!

Thursday, March 13, 2008

the Polymer Clay collection


the Polymer Clay collection
Originally uploaded by Zoeowyn
MY husband thinks if Ive gone this far to organize them I should set the drawer up chromatic order.
The damage was mostly done at the latest Michaels 99 cent block sale. I ended up going back 4 times.
It seems like a lot at first glance, but then when I use it I think, on no I've already used so much gold!

This doesn't look like a problem to you does it?

Wednesday, March 12, 2008

Im not allowed to work alone


dragbox
Originally uploaded by Zoeowyn
Ever.
Whenever I start to "work" in clay it becomes a family affair. I have even gone as far as getting the kids their own clay supplies, since they usually want the ones I am currently using! I have a "clay bag" that is free access clay. They are encouraged to use their personal supplies first, but inevitably they NEED the color I am using, so they can get it from the clay bag.
If they don't want to do any work they have to sit in my lap. I work with sharp knives so they have learned to sit next to me, unfortunately they still lean on me, fortunately they love me, and want to be with be, and think its really cool that I make stuff with clay and they get to use mommy's tools (but not the really sharp blades).

Saturday, March 1, 2008

Go Vote!


NO, not election time. Its The PCAGOE Monthly Challenge time!
o look, go vote. You dont have to vote for me, but that would be nice!
I have 2 pics on the PCAGOE webpage now, the Octopus that is in the challenge, and the little scrap cat I made for the gift prize!

Friday, January 4, 2008

This is some of what I do


So what is it that I do artistically?
I fall in love, become obsessed, and bemoan the fact that I can't create art enough.
I like to combine all my interests, and blend cultural influences. Artistically I do a whole bunch, and refuse to limit myself to one medium. I do not feel that means I do not achieve proficiency in any one medium, to me it means I have thousands of outlets for the creative storm in my head.

Professionally I used to be a Graphic Designer. I specialized in Photoshop illustrations, and icons/logos. One of the things I still do is create digital illustration and small iconic illustrations. I primarily utilize this skill in creating t-shirt artwork that I post on my various Café Press sites.
I have in the past painted, and drawn, the traditional way with my hands. I still do. Again most of this artwork I use for t-shirts and other print on demand items, like cards and tote bags.
Ok, that covers some of the how I make art, now what is my subject matter?
My most prolific subject is belly dance related. My belly dance art can be seen at http://www.cafepress.com/mmex_1. I also design costuming patterns and occasionally create one of a kind belly dance costumes. These creations can be found at http://www.madamexcostumes.com.
I also am a big fan of piratical themed items, and am a basic smart-ass. The works that reflect this part of my world can be found at http://www.cafepress.com/smartmule. Now, I will be honest and that one is "under construction," as I am currently getting a new Café Press location for my fantasy and new-age/metaphysical art.
I also make jewelry. I tend to think of it as mini sculpture. I have had a long-term relationship with polymer clays. I took a break when I started having children, because I did not want exposure to any potentially harmful fumes. Yes, polymer clays are labeled non-toxic, but at the time it was a better-safe-than-sorry option, since we lived in a small apartment with poor ventilation. A spin off from the polymer clay was to begin working in Precious Metal Clay. This was obsession-at-first-class. I have become a level two certified instructor, and I love to teach as well as make unique jewelry with PMC. I still make jewelry and small accessory type objects using the polymer clay, and I do combine the two for a unique style.
I recently took a wire wrapping class, strictly to improve my wire skills. At the time I did not plan on adding wire wrapping to my repertoire, but it looks as if I have. I also have inherited a huge amount of vintage buttons, and yes they are making a way into what I do. My jewelry can be found at http://www.zoeowyn.etsy.com.
This year, 2008, I have returned to drawing and am working on a collection of under sea pictures. I am also taking my "mini sculptures" and actually doing just that, making mini sculptures, not necessarily for wear.

Thursday, January 3, 2008

Three art books Im starting this year with.

Three books I am starting 2008 with.
I have been perusing these books at Michael's and BAM off and on for months now. I was happy to find them in my library's system.

Book One:


Secrets of Rusty Things by Michael de Meng, published by North Light Books.
De Meng is a sculptural collage artist living somewhere off in Montana. His creations that are featured in this book look like ancient artifacts of personal shrines. He shares some techniques on how certain effects are created. Its not a step-by-step per say, but it is basically a "how-to," ok more of a "how'd you go about doing this." Stylistically the book is designed to look like an artistic sketch/notebook.
His over all style is appealing to me. I recently became interested in creating Milagros art, and taking my mini sculptures into the realm of shrines, and I already like the style of creating art as artifacts.

His website is www.michaeldemeng.com, and it has lots of his cool images

Book Two:

Pretty Little Things by Sally Jean Alexander, also published by North Light Books.
Ok I want to go learn how to solder now. The lady makes sparkly little glass based thinguses (a technical term) that are soldered together using shiny silver solder. This book is laid out more as a "step-by-step" and "how-to." Her work is very cool, but I don't need another hobby. I don’t need to add these skills to my repertoire just yet. (Repeat I don’t need to add soldering skills or supplies) Her work is inspiring, even though I don’t do anything even near what she does.

www.sallyjean.com. goodies and visuals abound, as well as shopping opportunities.


Book Three:


Altered Books Workshop by Bev Brazelton, also published by North Light Books.
This book has the same set-up, not quite a full "step-by-step" book, but definitely a directions based book. This book takes you through various collage techniques and how they apply to altered books. This book, of the three, actually covers information I already utilize in my art occasionally. Still it doesn’t mean I didn’t read the book thinking "why didn’t I think of this first?" And, realistically it does incorporate items I may actually get around to using. The author has a few samples that are very much book shrines. It really sparked the concept of taking my shrines into books.

www.bevbrazelton.com another well desinged website, not so content heavy as the other ones, but still has the information you might want.


All three boooks provide ample food for thought, and are fun to look at as well. MY problem with purchasing books like this is I look at them, think they are cool, put them away for a while and then wonder why did I purchase these? I'm glad I have to opportunity to check them out of the library. The real test for me is if I keep checking them out, then I will go purchase the book. (I have done that many times with polymer clay books.) In the mean time, I'm enjoying these books.

Book cover images borrowed from Amazon so you can see what they look like, Im gaining in no way by sharing these with you.