Pages

Showing posts with label polymerclay. Show all posts

Thursday, December 5, 2013

My clay is too hard

Well it happens, polymer clay gets old and goes stale.
When this happens it TAKES FOREVER to condition it, and frankly there are time when it just cannot be done with out some outside assistance.

I have a few different ways of dealing with clay when this happens.

Beat it into submission


handy dandy food processor

Standard conditioning isn't working, your hands are getting tired, and running the clay through the pasta machine just crumbles it up more. My first line of defense is the food processor. This little guy works magic, and is also "the bomb" when processing large quantities of clay.


Clay Softener


One way that a lot of folks will tell you condition your hard, dried out crumbly clay is to use clay softener. Ok, it works. But be warned: it melts the clay into a softer state, and it canpush it over the edge quickly.

The scene: the clay crumbles, wont stick to its self, forget running it through the pasta machine to smoosh it together, its a mess. You add a drop of softener, nothing happens. You add another 2 drops, and things are starting to show signs of improvement, but still not quite right. You think instead of working this mess more with your hands (getting those little clay particles a bit warm really helps them to become pliable) you decide to add another drop or 3 of softener, then whammy you have a slimy mess on your hands, and now have to figure out what to do with over conditioned clay thats too smooshy to do anything.

I have read you can use mineral oil, or baby oil. I haven't tried that yet, so I can't really tell you if its going to work.


Scrap clay/base colors

base colors blended from a variety of old polymer clays

I use a lot of "base clay," clay of whatever color as an under layer for projects. I find that this is the perfect job for old dried out clay. I take the clay, cut it into smallish chuncks and run them through my mini food processor (that I have had for 20+ years, still works great, and is completely dedicated to clay). I mix the colors all up. The funky little balls of clay will get every where, but I try to keep track of them. I run this mess through the pasta machine a bazillion times and usually end up with a fairly well mixed color.

mini balls of clay out of the food processor

Blend, slice, run it through the pasta roller


To catch the bits that fall off when I run it through the pasta machine, I place a piece of well conditioned clay, all rolled out, underneath to "catch" the pesky scraps that fall off.

Crumb catcher layer of conditioned
clay lining the bottom of the pasta roller.


Color control

Prepping stale clay to be conditioned with new clay, while maintaining the color.


Ok when color has to be maintained. I take the old hard stuff and layer it with fresh clay or the same/ similar color. I find this works best if I can layer the old clay with one of the super squishy clays like Fimo Soft or Sculpey III. Let the clays co mingle for a day or too. This lets whatever is in the polymers to sort of transfer back and forth. Then I hand condition it, use the handy little food processor if it needs some help, and of course roll the heck out it with the pasta machine.

I know some colors are no longer produced, in those cases I just go with the best match I can find.


The chemistry/whats going on here?
Im not going to get into al the fancy-dancey names of the compounds that are moving back and forth, because frankly I don't know them and don't care. What ever the plasticizers are in polymer clay that allow it be smooshable they need to be replaced in the old stale/dried out clay. Clay conditioner adds this plasticizer back in. This plasticizer can also come from other clays that still have it. In some clays there is too much of it, and thats why they are super easy to work with with minimal conditioning.

Check back next week for part two "My clay is too soft"

Thursday, October 17, 2013

The Ball Burnisher, Love this tool


I have a small collection of ball burnishers. The original one is from my art school days, when I used the tool to rub down custom colored text elements for design comps (yes that tool is over 20 years old, and I still use it!). It was during school that I discovered it was a great tool for clay (my first polymer clay playing was back in 1988/89). I now use the ball burnisher for polymer and metal clays.


Ball burnishers are great for making texture, drawing, smoothing seams, punching holes, and of course, making dots. Lots and lots of dots-for me that means suckers on tentacles.


Back when Sculpy expanded with the Studio brand clay, they also expanded the tool offerings. Even though Studio has disappeared from craft store shelves, the tools have not. That is a good thing, because the tools are fabulous. One of the sets is a small, piece, collection of ball burnishers one one end with clay pushers on the other. the different sizes of ball burnishers are very useful -- I particularly like the large ball for smoothing seams, and as a dome forming base.


My tiniest ball burnishers are nail tech tools--I got mine at a beauty supply store.

Drawing with a small ball burnisher
Not only are these tools great with clay. you can paint with them! They make perfect dots, and with some practice (clearly I need some more) and a flick of your wrist, you can make stars, swirls, flowers and fireworks.
I clearly need practice, painting with a ball burnisher.
If you don't have any ball burnishers, I can't recommend getting one enough. In the mean time you can use a dried up ball point pen (you don't want ink transfer), or knitting needles of various sizes. Aluminum knitting needles are incredibly handy tools to have as well, they make dots, they smooth, and you can use them as big hole forms.


Friday, September 27, 2013

Tutorials That Works: Polymer Clay Eyeballs


I decided I needed a good eyeball for a figurine I was making. I wanted it to be a good, glass-like eyeball, really add some pop, especially since the figurine has buggy-out eyes.

I encountered a few variations of this tutorial on Pintrest for how to make glossy doll eyes.


THEY WORK!
These were the tutorials I referenced:
http://mistymooncreations.blogspot.com/2010/10/glass-eyes-for-your-dolls-tutorial.html
http://munchkinscreations.com/Eye1to3.html
http://makeitwithme-kell.blogspot.de/2011/09/how-to-make-fimo-clay-eyes-for-pin-up.html


I made a full eyeball, since they needed to bug out.
I used some texture making tools, a pin and ball burnisher to "draw" the details of the iris in place.

I covered and cured the the balls following manufacturer's instructions. One eye cracked. I remember a few years ago some artists were having this issue– white beads cracking, there was something wonky in the formula. My white clay was from that time, and it was that brand. (my clay is several years old, Im sure this issue has been corrected-cracking upon curing is not normal.) Since the crack was on the back side of the eye, and would be covered with eyelid, I wasn't too worried about it.

I used watered-down acrylic paint to color the irises.

waiting for the liquid clay

After they dried I used some foil to brace the balls from rolling around.

I heeded the warnings about messing up the liquid clay, so I worked in the kitchen right next to my pre-heated oven.
liquid clay in place

right out of the oven, very cloudy
Everything worked just as described. I found that I did have to move my heat gun a bit closer than 3 inches to get the liquid clay to clear up.
had to move the heat gun a bit closer than 3 inches


the irises got all glassy!

And here you can see the eyes in place. 

Thursday, August 4, 2011

Chithuly


Chithuly
Originally uploaded by Zoeowyn
And here is the finished bracelet!

Chithuly= I thought it looked like a Chihuly chandelier, my husband thought it was overly Chuthulu.....


This is a completely over populated bracelet with a center piece jeweled octopus made from polymer clay.
Im very proud of myself because I figured out how to solder all the links together.

one center piece octopus,
10 gradation silver to pearl tentacles
4 spirals
4 pearl trumpets
6 stick pearls
4 glass beads with spirals
8 bicone crystals
6 large firepolished glass beads
2 polymer beads
6 pearls with polymer bead caps
10 bead caps
20 shell disks
Im not counting how many jump rings or how many seed beads

octopus bracelet

Tuesday, July 19, 2011

Things that make you go hmmmmm


If polymer clay had a Master's Registry list of accomplishable tasks for certain skill levels, I wonder what would be on that list?
Any ideas?

Friday, February 25, 2011

Hermit Elephant


Hermit Elephant
Originally uploaded by Zoeowyn
Artist groups frequently discuss or analyze where does inspiration come from. The standard "pageant" answer is "I find my inspiration in nature." Well bully for them, cause I don't.

I don't find inspiration, it hunts me down and smacks me on the head.
Lorena Angulo has been making these AMAZING paper clay rings. 10/52 RAW 2011

I have been really inspired to make something along the lines of that shape, of course my deity pack would look awesome in the bright colors. Since ever since her first altar ring
3/52 RAW 2011
I have been thinking a Ganesh alter ring would be awesome. Then looking at the style and color of her paper clay rings Im thinking Ganesh and Kali, and Shiva.... you get the idea. Well Im letting that idea stew some more, and you will probably see some of those happen --especially after i visit the Vishnu exhibit at the Frist

So Here I am thinking about elephant gods, shrines, colorful and square rings. And Im listening to Hat Full of Sky by Terry Pratchett who is just brilliant beyond belief, and the book starts talking about the thin skinned hermit elephant of Howondaland.

Yeah, well there ya have it. It all comes in from various places, gets all mixed up in my head, then it says Ta-da here I am with a fying pan to the back of the head.

I present my Hermit Elephant of Howondaland ring. It is on a square base, yes a visual nod to Lorena's ring shape, it is an elephant, though not a pink Ganesh, and well....that sort of explains my inspiration process.


From Wikipedia:
Hermit Elephant
A native of Howondaland, the hermit elephant is a close relative of the more commonly known elephant. However, the Hermit elephant has an uncommonly thin and vulnerable skin by comparison to these. In order to protect itself, the hermit elephant will walk into a village, enter a house or hut and lift it upon its back, carrying it away. As it grows, the elephant will periodically shed its house in favor of a new, larger one, much like hermit crabs. Hermit elephants frequently travel in herds, and these can easily be mistaken for villages if found while the animals are resting. Mentioned in Men at Arms, Hat Full of Sky.

Thursday, April 22, 2010

The Hat


I have been mildly obsessed with the Mad Hatter's hat from Tim Burton's Alice in Wonderland. Im not exactly certain why. I have also been fascinated with the mini victorian style top hats, and how they really work in Steampunk fashion.

So where did it all start? Well I am a fan of Tim Burton's movies. Simple, easy, to the point. I admire Johnny Depp as an actor, no he's not hard to look at but I actually do not have a movie star crush on him.
And well, I believe Tim owes me some royalty fees for using my hair. Oh yeah, thats my hair alright, down to the color.

And well if its my hair, then its a natural to think I should be that Mad Hatter for some costuming event (no I don't have a specific event). But Im not a boy, and I don't want to dress as a boy; no I want to do a girlie version. So naturally the feminine mini hat seemed like a "oh why not." Gives me something else to try to make.

I am soooo not a hat maker, I have tried, and I understand why they cost what they cost. But I still wanted to make that hat. Out of clay! So I have been working out in my head for just over a month how to construct a hat in polymer clay. I have 3 designs I want to try out. Will I make more after that? Don't really know, lets see how these 3 go first.

I finally was able to spend some quality time working on the hat. I made my pattern, modified it a bit and remade the pattern. Then I cut the pattern out of screen door mesh. Then I cut it out of clay. The assembly required some curing of bits before assembly, and super glue to help. Along with some strategically placed wads of paper for curing support.

So far I have 5 curing rounds, I have a few tweaks to do so there is at least one more cure. The hat as pictured is not quite finished, there are some details that need to be finished, like the hat pins across the front, and the tag needs the 10/6 written on it. its "lined" in orange, because I wasn't sure I was going to actually do this hat at the time, but I like it. I'm pleased with how it has turned out. I will finish it up in the next day or two, and do a trial run on actually wearing it; its heavier than I had originally thought it would be, so I am thinking I should try out the featherlight sculpy product--that stays light even after curing--for some base construction.

The pictures: in progress, you can see the mesh; assorted views

Monday, March 29, 2010

ooh look! A chicken.


I have self published a tutorial for shaker chickens!
The tutorial is available at Claylessons.com

This isnt my first tutorial, I have actually posted some project tutorials here on this blog, but it is my first attempt to sell one!

weeee!

This is a project I submitted to Polymer Cafe and never heard back from them, so pppththth to them.
Of course I would like to be magazine published with a tutorial at some point, and I am working towards that goal.
So ta-da!

just in time to make use of all those plastic Easter eggs!

Thursday, February 18, 2010

Lent Thing-a-day


In a discussion about Lent with a group on non-Catholics one lady determined anyone participating (in this specific group) was really using Lent as an excuse to better themselves for a healthier lifestyle. Nothing wrong with that. She also wondered since it wasn't for religious reasons why deprive yourself, why not add something for improvement: like smile at your neighbor who is a %^&, or add an apple a day. And then in the world of Universal Manifestation you want to use positive phrase-ology.
Since I do pay more attention to Universal Manifestation than I do to Lent I will be adopting actions for lent:

I am embracing positive and empowering beliefs, exercising regularly, and creating something creatively every day.

I missed Thing-a-day for February, so I have created my own thing-a-day for lent.

Day One

I recently fell in love with resin. I absolutely needed it for one specific project. never used it before but needed it. So I braved forth into the resin world, and boy-oh-boy is it easy, and the results cool beens.
I started toying with what to fill, and started to make frames for use with resin. Last night I wanted to use up this lump of leather brown clay. I played with frame shapes. And single color (to be enhanced after curing) versus multi color.

Tuesday, June 2, 2009

Paisleys and dots


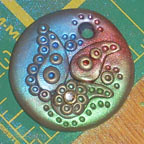
Applying color theory to creating a colorful paisley and dot pendant.

This pendant takes approximately 1/4 of a standard sized block of polymer clay. Using a neutral color, condition and roll out a section of clay. Roll your section on the second or third to largest setting of your pasta machine. (The largest for my machine is a 7-I rolled my clay at 5).
Fold the clay over on itself and lightly press together--doubling the thickness, and removing any air bubbles.

Place a sandwich baggie smooth over the surface of the clay. Press into the clay, through the baggie, with a round cookie cutter-about 2 inches in diameter. The sandwich baggie makes a nice beveled edge to the cut shape.

Roll the remaining clay back thru the pasta machine, at the same setting. The remainder of the shapes will be cut from a single layer of the clay.

Using a small round Kemper punch cut out several small dots. Roll these into small balls. Using the small round punch, cut a hole into the top of the pendant base. Approximately 1/4 inch from the edge.


Using a small tear drop shape cookie cutter, cut 3 shapes. Use your fingers to gently curve the tear drops into paisleys.
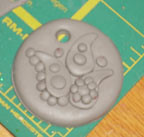


Arrange the paisley shapes and dot balls in a pleasing arrangement. For smaller dots cut the  punched dots in half.


Place a hot set crystal on one of the larger dots as accent bling. Use the tip of a knitting needle to push accent dots into the centers of the clay dots, and along edges of shapes.
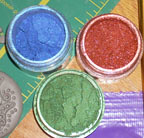


Use color theory principles to help select pigment powder colors. Apply colors loosely with soft brush. Do not inhale the pigment particles, cover your mouth and nose, and use in a well ventilated area.

Cure following the polymer clay brand's instructions. When cool brush off any excess pigment powders and coat with Varathane, or your polymerclay coating of choice to protect the mica pigment colors on your design.

Saturday, January 24, 2009

Art Cards


4 ACEO
Originally uploaded by Zoeowyn
Im not a big art card maker. But I do try, and they are this months challenge in PCAGOE, and I do try to participate in the ones that are a challenge to me. I find the challenges help push me out of my comfort zone, making it larger.
So, I made art cards.
The top winged heart, and the filagree heart under that one both burned. I was bummed. later I decided to white wash them, instead of doiing a darker antiquing the way I usually do. I must say i was surprized. The white wash gave the cards a nice shabby chic look.
The mica powdered covered heart was my next attempt. Its not finished. It may never be finished. See all those lumps and bumps? Well, it boiled up during the curing process. I guess my toaster oven in the garage in the middle of winter is not such a good idea, it obviously could not maintain a constant temp, and most likely had temp spikes. Oh well. The hubby said sell it anyway no one will know. Doink--I will! He can be kinda thick sometiimes!
The last one is my attempt at steam punk. I think it turned out a bit more industrial than steam punk, but Im on my way. It is the card I selected as my entry piece for the challenge.

The challenge will be up and available for voting next week at http://www.pcagoe.com

Thursday, August 7, 2008

I like this idea!


this is a component clay cane.
As in its ment to be used as part of some thing, its an enhancement instead of the star.
Most canes I see for sale are the star.
Whenever I think about selling canes they are stars. --I dont mean a literal star I mean the focal piece.
Good idea!
this is by Valleycreations.etsy.com

And its currently on sale