Pages

Showing posts with label diy. Show all posts

Thursday, May 30, 2013

DIY no sew tote bag from t-shirt


This is the blog post I was going write. Fortunately I found the cable for my camera.


I found this cute zombie t-shirt at good will, and, well we like zombies at our house, so I figured this would be a great shirt to use for the project (that and it certainly wasn't going to fit any of us).


Step 1: Trim the sleeves off,  trim the bottom hem off, trim the collar out. I used a square shape.


Step 2: Stretch all the areas you cut so the edge rolls.


Step 3: Fringe the bottom of the shirt. I cut these about 1/4 inch to about 1/2 inch.
I cut my fringe a bit deep, since I didn't want the sponsors on my bag. Next time I won't make the fringe so long.


Step 4: Cut off the hem from one of the sleeves. Trim 4 strips about 1/2 inch wide.


Step 5: Trim the seem from the four strips, and stretch them so they roll.


Step 6: Use the strips to tie bows on the straps.


Step 7: Tie opposite fringes together. I used a basic double knot. Then tie the side-by-side fringes together. This makes a nice tight bottom with minimum holes (see next picture).


The inside of the bag, see tight holes.


Ta-da fringy zombie bag.


If you don't like all the fringe, even if it were cut shorter, you can tie the fringes together on the inside. Your bag would look sort of like this instead.


Thursday, May 16, 2013

No sew t-shirt bags

This is not the post I was going to write.
I took a whole bunch of step-by-step photos for a no-sew t-shirt bag, and now I cannot find the cable to plug the camera into the computer! Its a totally cute zombie 5k shirt, and now a book bag for the kid--totally appropriate (I have unique and awesome kids that way).
GAH!

So Instead please go visit these other blogs for some awesome ideas for re-crafting t-shirts into bags

Do Stuff on leethal's blog for another variation of a no-sew t-shirt bag.
http://www.leethal.net/zine/?p=1344

I particularly like wrapping presents in the bag, double gifting! Talk about reduce reuse recycle.  This is a great idea to give shopping bags to someone, encouraging the use of reusable shopping bags, reusing t-shirts, and reducing wrapping paper garbage!


Im already thinking about doing this for this years gifting fiasco called christmas. Wrapping prezzies in t-shirt bags that is.


Or go visit ecouterre for this version thats been making the rounds on pintrest:
http://www.ecouterre.com/recycle-an-old-t-shirt-into-a-produce-grocery-bag-diy-tutorial/t-shirt-produce-bag-1/
It does involve sewing.

This one at So you Think You're Crafty involves knitting: http://www.soyouthinkyourecrafty.com/2011/07/t-shirt-yarn-knit-market-bag-tutorial/

And this one from Art Threads gets a little fancy:
http://artthreads.blogspot.com/2011/03/wednesday-sewing-repurposed-t-shirt.html


And as soon as I get that darned cable, I will post my variation of a no-sew t-shirt bag.

Wednesday, March 20, 2013

Glass nail polish gems


They are shiny and sparkly and sooo much fun to make


I tripped over this youtube tutorial the other day by CraftKlatch. I seriously have no idea how i found it, or what I was looking for. But there it was and it was sparkly, so I watched.

And how cool are these things!


They are super easy, and sort of addictive to make. I think Im going to use them with polymer clay.

Oh and I made eyes...the possibilities...


I started with some plain ones, added glittery nail polish, gave the back a nice solid opaque coating of polish.

They look like a poor mans faux dichroic glass piece
The eyes I made--insert maniacally evil mwhahahah

Wednesday, January 9, 2013

Bath salts (not the kind that make you eat someone's face)

DIY bath salts
More from my DIY Christmas.
Bath salts make an easy group gift -you know that gift that is easy to make in mass and give to large groups. Most people fall back on baking, I don't bake much--only unless its as a set up for cake decorating. This was my "group" gift this year.

As a crafty person I have large quantities of weird stuff laying around the house. I actually made this batch of bath salts and only had to purchase the baking soda and the sea salt!

I used:
one box of baking soda
one tube of sea salt
half a sachet of lavender
lavender essential oil
glycerin
epsom salts
food coloring

I filled a medium bowl half full with baking soda.
I added 10 drops of glycerin and 5-6 drops of lavender oil.
I blended the  the glycerine and the oil into the soda, adding more soda as I went until every thing was blended and dry.

In a large bowl I added the baking soda oil mix, the rest of the baking soda, the sea salt, half of my lavender sachet and the epsom salts.

I had 2 cups of menthol and eucalyptus epsom salts and 2 cups of plain epsom salts.

I blended everything together.

I then added a few drops of blue food coloring to a paper towel (I didn't have purple, so blue it was), and I do mean a few 4 to 6. Then stir the mix with the colored towel. This will transfer a slight color into the mix. The color isn't needed, it just makes it a bit more "special."


The bath salts were divided up into baggies, and placed into small containers. Easy-peazy, and a nice soothing nice smelling bath for all.


Wednesday, January 2, 2013

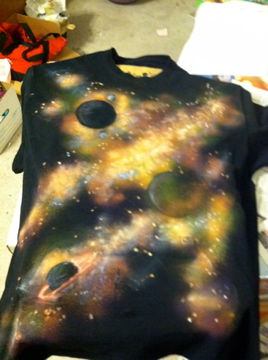
Galaxy Print T-shirts

My hubby in his galaxy print t-shirt

 I want to Galaxy print ALL THE THINGS!

So apparently in the fashion world galaxy print is all the rage. Im not sure how I stumbled across a fashion trend while it was still going on, but I did. And I decided I really needed to make so galaxy print t-shirts for Christmas gifts this past year.

I Googled a few DIY galaxy print how-tos, and so, Im adding another one to the list of DIYs out there. Why? Because I am infatuated with this process, and I cannot wait to galaxy print more things!

I found this works best with cotton t-shirts. I tried some bleach pen "prints" on polyester blend shirts and it really did not bleach well at all.


Supplies:
bleach in a spray bottle
Clorox bleach pen for white fabric
fabric paint
sponge
paint brush
card board panel
plastic garbage bags
a washing machine or tub
random sized round items that can be sprayed with bleach (round lids, roll of tape)
a dark (black or dark blue) cotton t-shirt

round items to make planets,
bleach in spray bottle, bleach pen 

The set up:

Cover your work area in plastic bags to protect it from the bleach

Line the inside of your shirt with a plastic bag and card board panel. This will help keep the shirt panel stiff, and prevent the bleach from bleaching through to the back. 


The how-to:

The bleaching process
Randomly place the round items to mask areas to create planets
Spritz with bleach
make dots (stars) with the bleach pen--I discovered you can shake the bleach pen lightly and it wil splatter dots around, you don't have to draw every dot

At this point you don't have to let the bleach sit long, it has already started to remove dye from the shirt.

Rinse your shirt in the washer or rinse it well in a tub.

A light spritz of bleach in front of the  planets adds to that nebula effect.

You can decide if the shirt needs more bleach or more stars at this point.
If you do a second beaching, remember to rinse a second time.


The painting process
The shirt will need to be dry before adding fabric paint

I have this interesting air brush fabric paint system I scored on clearance from Joann's. Its called Color Artz, and I do enjoy playing with it. The colors are pretty intense and it paints well. http://www.joann.com/color-artz-airbrush-starter-kit/zprd_02128668a/

I started with darker colors, purple and dark blue. I sprayed along the transition edges bleached areas to unbleached areas.

I next sprayed brighter colors pink, lime, yellow.


After I sprayed color areas, I used a sponge and white fabric paint to create the highlights.
I used a make up sponge and watered down the fabric paint just a touch.

I then touched up the edges of the white with brighter colors, magenta, and light blue.

I then touched all the star bleach spots with a paint brush and white paint.


Finishing up
Let the paint dry 24+ hours, then heat set with a pressing cloth and an iron. (Don't iron directly on the fabric paint, it might mess up your iron.)


Thats my DIY on galaxy print making. I am planning on trying this on a work shirt, and maybe some yardage so i can sew something up.