Introduction to Metal Clay:
Layered Copper Pendants
Beginner level
This class is great for all levels, but geared towards those who have never worked
with metal clays before, and those who have never worked with copper clay before.
In this class students will make a layered pendant using texture stamos and molds.
Students will learn basic composition planning by sketching and making molding clay
mock ups of their ideas. Using dry assembly techniques students will create a
layered pendant featuring a swing bail.
Historical Monthaven Mansion
Saturday September 8
12:30 to 3:30
Class fee $75
includes:
30 grams of Metal Adventures CopprClay
class use tools:
kiln ring
tumble polishing of pieces
additional clay will be available to purchase from instructor
Class size is limited,
please contact Hendersonville Arts Council to reserve:
Hendersonville Art Council
PO Box 64
Hendersonville, TN 37077-0064
615 822-0789
email: ArtsCouncil@Monthaven.org
Web: www.hendersonvilleatrs.org


 Place a sandwich baggie smooth over the surface of the clay. Press into the clay, through the baggie, with a round cookie cutter-about 2 inches in diameter. The sandwich baggie makes a nice beveled edge to the cut shape.
 Using a small round Kemper punch cut out several small dots. Roll these into small balls. Using the small round punch, cut a hole into the top of the pendant base. Approximately 1/4 inch from the edge.
 Using a small tear drop shape cookie cutter, cut 3 shapes. Use your fingers to gently curve the tear drops into paisleys.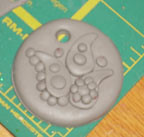
 Place a hot set crystal on one of the larger dots as accent bling. Use the tip of a knitting needle to push accent dots into the centers of the clay dots, and along edges of shapes.