
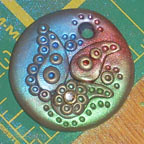
Applying color theory to creating a colorful paisley and dot pendant.
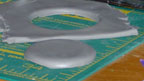 Place a sandwich baggie smooth over the surface of the clay. Press into the clay, through the baggie, with a round cookie cutter-about 2 inches in diameter. The sandwich baggie makes a nice beveled edge to the cut shape.
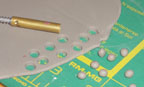 Using a small round Kemper punch cut out several small dots. Roll these into small balls. Using the small round punch, cut a hole into the top of the pendant base. Approximately 1/4 inch from the edge.
 Using a small tear drop shape cookie cutter, cut 3 shapes. Use your fingers to gently curve the tear drops into paisleys.
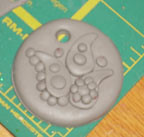 Arrange the paisley shapes and dot balls in a pleasing arrangement. For smaller dots cut the punched dots in half.
 Place a hot set crystal on one of the larger dots as accent bling. Use the tip of a knitting needle to push accent dots into the centers of the clay dots, and along edges of shapes.
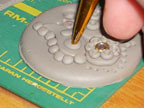
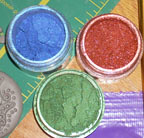 Use color theory principles to help select pigment powder colors. Apply colors loosely with soft brush. Do not inhale the pigment particles, cover your mouth and nose, and use in a well ventilated area.
This pendant takes approximately 1/4 of a standard sized block of polymer clay. Using a neutral color, condition and roll out a section of clay. Roll your section on the second or third to largest setting of your pasta machine. (The largest for my machine is a 7-I rolled my clay at 5).
Fold the clay over on itself and lightly press together--doubling the thickness, and removing any air bubbles.
Place a sandwich baggie smooth over the surface of the clay. Press into the clay, through the baggie, with a round cookie cutter-about 2 inches in diameter. The sandwich baggie makes a nice beveled edge to the cut shape.Roll the remaining clay back thru the pasta machine, at the same setting. The remainder of the shapes will be cut from a single layer of the clay.
Using a small round Kemper punch cut out several small dots. Roll these into small balls. Using the small round punch, cut a hole into the top of the pendant base. Approximately 1/4 inch from the edge.Using a small tear drop shape cookie cutter, cut 3 shapes. Use your fingers to gently curve the tear drops into paisleys.Arrange the paisley shapes and dot balls in a pleasing arrangement. For smaller dots cut the punched dots in half.Place a hot set crystal on one of the larger dots as accent bling. Use the tip of a knitting needle to push accent dots into the centers of the clay dots, and along edges of shapes.Use color theory principles to help select pigment powder colors. Apply colors loosely with soft brush. Do not inhale the pigment particles, cover your mouth and nose, and use in a well ventilated area.Cure following the polymer clay brand's instructions. When cool brush off any excess pigment powders and coat with Varathane, or your polymerclay coating of choice to protect the mica pigment colors on your design.