Pages

Wednesday, January 30, 2013

Fan Art


Fan art.
I've been following a lot of fan art based on the Hobbit movie lately. It got me thinking, how as a teenager I was able to spend hour making fan art, mostly drawings. Now I feel as if Im missing being ale to make fan art.
Its a wonderful way to pay homage to something you admire. It also gives you a subject to work with when otherwise you might not know what to work with.

As a jewelry artist I realize I have been doing some fan art. Its not a portrait drawing, but it is fan art!

I'm a big fan of Sherrylin Kenyon and her Dark Hunter novels.
http://www.sherrilynkenyon.com/
 Im fortunate enough to live in the same are she does, so I have had multiple opportunities to meet her at launch parties. And her publisher puts on some fantastic launch parties! I tend to have boot envy at these parties, since I do not have fantastic boots, and for some reason all the folks who dress up in character always have to most fantabuous boots!

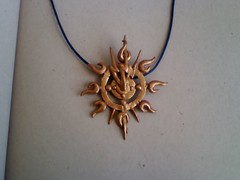
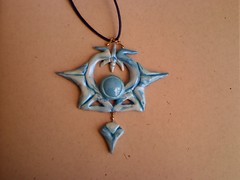
One year I decided to make some necklaces based on the cover art of Acheron and Bad Moon Rising.

I know Ive posted these images before, but not in this context, the context of "hey I do make fan art".

I made a pair of earrings based on what Queen Gorgo wore in the movie 300. And as gifts for some author friends I made symbols that represented their book characters. And lets not forget my mini polymer clay Mad Hater Hats!


There is a ton of Doctor Who fan art out there, and those fans make everything from copies of the famous scarf to formal dresses of the Tardis.
http://fashionablygeek.com/costumes/this-brilliant-tardis-dress-is-bigger-on-the-inside-cosplay/

This dress is just brilliant!


Lets not forget Star Wars and the fan art this generates. There have been baby girl dresses to R2D as vespa
http://bjornstar.com/post/1035003311/r2-d2-c3po-twins-if-i-have-twin-girls-theyre


http://hiconsumption.com/2012/11/star-wars-r2-d2-vespa-scooter-motorcycle/


I was introduced to the Hunger Games books from a fellow artist who was participating in ring a week on Flickr in  2010. She made a ring based on the game arena. It was an interesting concept, and peaked my interest in the books.

Fan art is great. It can help generate more fans.

I still want to make some Hobbit fan art, time to think what I can do from the book or movie (and I don't just want to copy a piece thats in production).


All images copyright to their owners, links to blogs where images originated.


Friday, January 25, 2013

Oh I hate bad news

ColorArts fabric paint
Just say no.

This would qualify as a negative review. Don't use this product on any fabric you intend to wear and wash.

I used it on my galaxy shirts, and another shirt for hubby. Its washing off. 

Such a shame, it went on so well.

 http://www.joann.com/color-artz-airbrush-starter-kit/zprd_02128668a/

Wednesday, January 23, 2013

The Friesen Project


For the past several years I have been participating in various artist group projects. Ive played with ring a week, and four a month, and last year I must admit I did not finish one single one group.

This year I hope to finish. I've joined the Friesen Project. I adore Christi Friesen's work, I have all of her books, so this is just going to be so much fun for me.

http://katersacres.com/polyclay/friesen/friesen-project-overview/

This is the brian child of Kaite, from Kater'sacres. She has established a Pintrest board, and a Facebook group revolving around this project.  Artists from around the world are participating. Its really wonderful to see how many artists Christi Friesen's work has inspired.

Here are my first two babies from the project:


this is Hamlet and Horatio.

Visit Kater's Acres for more info on this project

The Pintrest board:

Christi Friesen:

Wednesday, January 16, 2013

Blogging for other people


I've started off this year with a short series of Getting Started with Polymer Clay posts over at Artisan Whimsey.

This week's installment includes three simple tutorials in "playing" with clay


Wednesday, January 9, 2013

Bath salts (not the kind that make you eat someone's face)

DIY bath salts
More from my DIY Christmas.
Bath salts make an easy group gift -you know that gift that is easy to make in mass and give to large groups. Most people fall back on baking, I don't bake much--only unless its as a set up for cake decorating. This was my "group" gift this year.

As a crafty person I have large quantities of weird stuff laying around the house. I actually made this batch of bath salts and only had to purchase the baking soda and the sea salt!

I used:
one box of baking soda
one tube of sea salt
half a sachet of lavender
lavender essential oil
glycerin
epsom salts
food coloring

I filled a medium bowl half full with baking soda.
I added 10 drops of glycerin and 5-6 drops of lavender oil.
I blended the  the glycerine and the oil into the soda, adding more soda as I went until every thing was blended and dry.

In a large bowl I added the baking soda oil mix, the rest of the baking soda, the sea salt, half of my lavender sachet and the epsom salts.

I had 2 cups of menthol and eucalyptus epsom salts and 2 cups of plain epsom salts.

I blended everything together.

I then added a few drops of blue food coloring to a paper towel (I didn't have purple, so blue it was), and I do mean a few 4 to 6. Then stir the mix with the colored towel. This will transfer a slight color into the mix. The color isn't needed, it just makes it a bit more "special."


The bath salts were divided up into baggies, and placed into small containers. Easy-peazy, and a nice soothing nice smelling bath for all.


Wednesday, January 2, 2013

Galaxy Print T-shirts

My hubby in his galaxy print t-shirt

 I want to Galaxy print ALL THE THINGS!

So apparently in the fashion world galaxy print is all the rage. Im not sure how I stumbled across a fashion trend while it was still going on, but I did. And I decided I really needed to make so galaxy print t-shirts for Christmas gifts this past year.

I Googled a few DIY galaxy print how-tos, and so, Im adding another one to the list of DIYs out there. Why? Because I am infatuated with this process, and I cannot wait to galaxy print more things!

I found this works best with cotton t-shirts. I tried some bleach pen "prints" on polyester blend shirts and it really did not bleach well at all.


Supplies:
bleach in a spray bottle
Clorox bleach pen for white fabric
fabric paint
sponge
paint brush
card board panel
plastic garbage bags
a washing machine or tub
random sized round items that can be sprayed with bleach (round lids, roll of tape)
a dark (black or dark blue) cotton t-shirt

round items to make planets,
bleach in spray bottle, bleach pen 

The set up:

Cover your work area in plastic bags to protect it from the bleach

Line the inside of your shirt with a plastic bag and card board panel. This will help keep the shirt panel stiff, and prevent the bleach from bleaching through to the back. 


The how-to:

The bleaching process
Randomly place the round items to mask areas to create planets
Spritz with bleach
make dots (stars) with the bleach pen--I discovered you can shake the bleach pen lightly and it wil splatter dots around, you don't have to draw every dot

At this point you don't have to let the bleach sit long, it has already started to remove dye from the shirt.

Rinse your shirt in the washer or rinse it well in a tub.

A light spritz of bleach in front of the  planets adds to that nebula effect.

You can decide if the shirt needs more bleach or more stars at this point.
If you do a second beaching, remember to rinse a second time.


The painting process
The shirt will need to be dry before adding fabric paint

I have this interesting air brush fabric paint system I scored on clearance from Joann's. Its called Color Artz, and I do enjoy playing with it. The colors are pretty intense and it paints well. http://www.joann.com/color-artz-airbrush-starter-kit/zprd_02128668a/

I started with darker colors, purple and dark blue. I sprayed along the transition edges bleached areas to unbleached areas.

I next sprayed brighter colors pink, lime, yellow.


After I sprayed color areas, I used a sponge and white fabric paint to create the highlights.
I used a make up sponge and watered down the fabric paint just a touch.

I then touched up the edges of the white with brighter colors, magenta, and light blue.

I then touched all the star bleach spots with a paint brush and white paint.


Finishing up
Let the paint dry 24+ hours, then heat set with a pressing cloth and an iron. (Don't iron directly on the fabric paint, it might mess up your iron.)


Thats my DIY on galaxy print making. I am planning on trying this on a work shirt, and maybe some yardage so i can sew something up.