 |
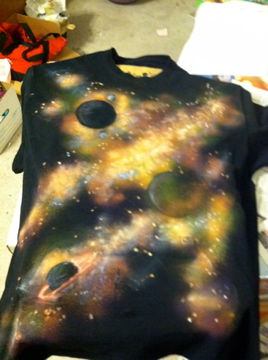
| My hubby in his galaxy print t-shirt |
So apparently in the fashion world galaxy print is all the rage. Im not sure how I stumbled across a fashion trend while it was still going on, but I did. And I decided I really needed to make so galaxy print t-shirts for Christmas gifts this past year.
I Googled a few DIY galaxy print how-tos, and so, Im adding another one to the list of DIYs out there. Why? Because I am infatuated with this process, and I cannot wait to galaxy print more things!
Supplies:
bleach in a spray bottle
Clorox bleach pen for white fabric
fabric paint
sponge
paint brush
card board panel
plastic garbage bags
a washing machine or tub
random sized round items that can be sprayed with bleach (round lids, roll of tape)
a dark (black or dark blue) cotton t-shirt
 |
| round items to make planets, bleach in spray bottle, bleach pen |
The set up:
Cover your work area in plastic bags to protect it from the bleach
Line the inside of your shirt with a plastic bag and card board panel. This will help keep the shirt panel stiff, and prevent the bleach from bleaching through to the back.
The how-to:
The bleaching process
Randomly place the round items to mask areas to create planets
Spritz with bleach
make dots (stars) with the bleach pen--I discovered you can shake the bleach pen lightly and it wil splatter dots around, you don't have to draw every dot
At this point you don't have to let the bleach sit long, it has already started to remove dye from the shirt.
Rinse your shirt in the washer or rinse it well in a tub.
A light spritz of bleach in front of the planets adds to that nebula effect.
You can decide if the shirt needs more bleach or more stars at this point.
If you do a second beaching, remember to rinse a second time.


The painting process
The shirt will need to be dry before adding fabric paint
I have this interesting air brush fabric paint system I scored on clearance from Joann's. Its called Color Artz, and I do enjoy playing with it. The colors are pretty intense and it paints well. http://www.joann.com/color-artz-airbrush-starter-kit/zprd_02128668a/
I started with darker colors, purple and dark blue. I sprayed along the transition edges bleached areas to unbleached areas.
I next sprayed brighter colors pink, lime, yellow.


After I sprayed color areas, I used a sponge and white fabric paint to create the highlights.
I used a make up sponge and watered down the fabric paint just a touch.
I then touched up the edges of the white with brighter colors, magenta, and light blue.
I then touched all the star bleach spots with a paint brush and white paint.


Finishing up
Let the paint dry 24+ hours, then heat set with a pressing cloth and an iron. (Don't iron directly on the fabric paint, it might mess up your iron.)


Thats my DIY on galaxy print making. I am planning on trying this on a work shirt, and maybe some yardage so i can sew something up.
3 comments:
great idea and the result looks great! I wanna make some to
/Anna Siivonen
Looks great! I wanna try this
/Anna Siivonen
what a gorgeous effect!
I think it would also look awesome all around the bottom of a skirt.
Post a Comment