Pages

Friday, September 11, 2009

Mehndi


I love doing henna--or mehndi. There is something about drawing with the cone, creating the stylized patterns that are based in tradition. Creating variations.
Something about it that I can do for hours.
Its more that just the drawing portion.
There is something very soothing and sensory about the entire experience.
Maybe it is the essential oils mixed into the henna, the smell, maybe its the texture of the paste.
I can keep going even when my hand hurts. Actually I dont usually notice my hands or my back when Im doing henna--just after when I try to move again.
I can go for hours without doing anything but henna. And I do mean hours.

In an exercise to discover when am I in the "flow" of creativity, I wrote repeatedly that it occurs when Im playing with henna, more so than with clay, or drawing.

And its not about the drawing. I can draw, I practice henna style work with markers, not the same. The closest I have come is fabric paint. And this has resulted in a painted dresser, many purses, and now a pair of shorts. I am thinking about extending onto more clothing.

Im very excited, in a conversation with a dear friend she suggested that I do henna at a local small festival instead of vending my jewelry as I normally would. I decided to do that. And as soon as I did I got 2 more opportunities to "do" henna.

I haven't done henna at this level in a long time. I am looking forward to it very much.
Tomorrow is the first faire. If you are in Hendersonville TN, come by The New Earth Center I will set up at 11am and hang out henna-ing until.....

Thursday, August 13, 2009

Discussing Steampunk


Originally uploaded by Zoeowyn
I will be discussing Steampunk with Mitzi on Bead Java Saturday August 15, 9 pm central. On Blogtalkradio


http://www.blogtalkradio.com/Bead-Java/2009/08/16/Bead-Java-Your-Hot-Forum-For-Hand-Crafted-Jewelry

Monday, August 10, 2009

Burning up!

It is way to hot outside. I feel like I could make a bunch of projects out of polymer, put them on the back porch and in 20 minutes they would be cured! I know its not even as hot here as it could be. I finally made it to Tuscon--ok in the middle of July--ouch talk about hot!

Im not very motivated in extreme weather, Im sort of like a lizard, I just want to go lay out under a big flat rock and do NOTHING.

Here are some goodies from folks over at etsy who didn't just do nothing. Of course they all remind me of how hot it is...


This is Treade hes a fire dragon from ElementalDragons
isnt he cute!


And this pen is called Dragon Skin its from creativewriting


And these swirling Rust leaves look like flames to me. Beautiful pendant is by iamcr8tive.

Thursday, August 6, 2009

Cepholapod Coronet


My mermaid with the octopus crown made it in to the current (August 2009) issue of Polymer Cafe. It was killing me to not post images of her on the internet, since they say no previously published images, and posting it on flikr is "publishing".
Well here she is, this is another view from the magazine. I was trying to show off as many different textures on her as possible.
The challenge was for texture.
The face and arms are poceline, I did not make them, the rest of her is pretty much polymer clay using different sculpting techniques.

Tuesday, June 2, 2009

Paisleys and dots


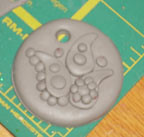
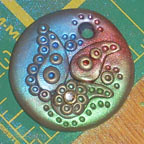
Applying color theory to creating a colorful paisley and dot pendant.

This pendant takes approximately 1/4 of a standard sized block of polymer clay. Using a neutral color, condition and roll out a section of clay. Roll your section on the second or third to largest setting of your pasta machine. (The largest for my machine is a 7-I rolled my clay at 5).
Fold the clay over on itself and lightly press together--doubling the thickness, and removing any air bubbles.

Place a sandwich baggie smooth over the surface of the clay. Press into the clay, through the baggie, with a round cookie cutter-about 2 inches in diameter. The sandwich baggie makes a nice beveled edge to the cut shape.

Roll the remaining clay back thru the pasta machine, at the same setting. The remainder of the shapes will be cut from a single layer of the clay.

Using a small round Kemper punch cut out several small dots. Roll these into small balls. Using the small round punch, cut a hole into the top of the pendant base. Approximately 1/4 inch from the edge.


Using a small tear drop shape cookie cutter, cut 3 shapes. Use your fingers to gently curve the tear drops into paisleys.


Arrange the paisley shapes and dot balls in a pleasing arrangement. For smaller dots cut the  punched dots in half.


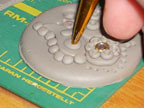
Place a hot set crystal on one of the larger dots as accent bling. Use the tip of a knitting needle to push accent dots into the centers of the clay dots, and along edges of shapes.


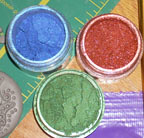
Use color theory principles to help select pigment powder colors. Apply colors loosely with soft brush. Do not inhale the pigment particles, cover your mouth and nose, and use in a well ventilated area.

Cure following the polymer clay brand's instructions. When cool brush off any excess pigment powders and coat with Varathane, or your polymerclay coating of choice to protect the mica pigment colors on your design.

Thursday, May 14, 2009

Its creativity time!


Everyone has a time of day they are most creative. I tell you what mine is not mid-afternoon! Its nap time.
I seem to be most creative first thing in the morning. Its like my coffee, gets my brain working. I can't seem to dedicate a whole lot of time to this first creative endeavor. I do seem to sit down, knock something out, then get to my day-whatever that means. This first brain boost sometimes, but not very often, rolls into a mass creative spell. And the next thing I know its nap time (about 4 in the afternoon) and Im still in my jammies!

My other creative time is evening. I seem to do my best work then. I get started right around 6 PM and can work late into the night.
I think this is left over from when I was a freelance graphic designer, and my husband worked swing shift. I tended to not "go to work" until he did. And I would work until he came home.

The best work creative environment for me is evening, basically alone-or not interrupted and lots of adventure movies. 5th Element, XXX (with Vin Diesel), and Timeline are a few of my favorites to work to.

Tuesday, May 5, 2009

Those little things that get in the way...

Ok so the mess in my work space really isnt little. But it is getting in the way. I have way more supplies and ideas than I have places to work. And the whole time issue of not having time to complete something one it has been started, well thats another one of those things.
I need more space
I need more time
and I need someone to please come buy this stuff, I dont want to store it anymore!

Sunday, May 3, 2009

Color theory with mica pigment powders

Color theory is the study of mixing color and the visual impact of certain color combinations. There are many aspects to be taken into consideration when studying color. The form of the color —opaque pigment, translucent inks, transparent light—impact how colors interact and mix.

Mica pigment powders are ground natural mineral (mica) flakes coated with and oxide, usually titanium or iron. The granules of the flakes are solid and reflect light; therefore they are discussed in terms of opaque pigments.
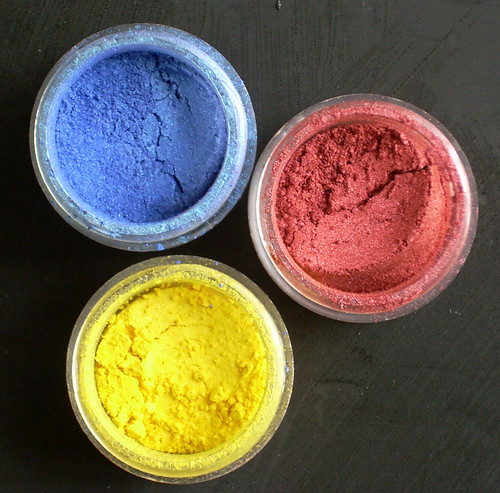


There are three primary colors when dealing with opaque pigments: red, yellow, and blue. These are base, or pure colors. These colors, or hues, cannot be achieved through mixing.


Hue is the name of a color (red, purple). It's easy to remember: Hue and Hugh are both names. Hue is a color’s name, just as Hugh is a man’s name.


The three primary hues are the basis of the color wheel. Think of a rainbow in a circle, showing the range of hues that can be created when the primary colors are mixed. A basic color wheel shows primary and secondary hues. Secondary colors are achieved by mixing two primary colors.
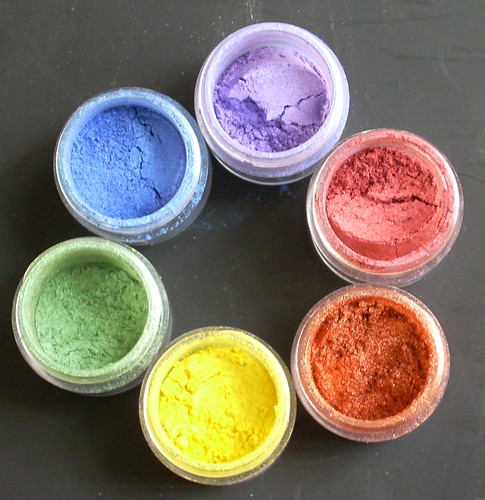


Yellow+ red= orange
Red+ blue=violet
Blue+yellow=green


Tertiary, or intermediate, hues are the next level of color blends.


Green+blue=aquamarine


Analogous colors are hues that are next to each other along one side of the color wheel. Think of the colors as being in “rainbow order.”


Complementary colors are in opposite positions on a color wheel.
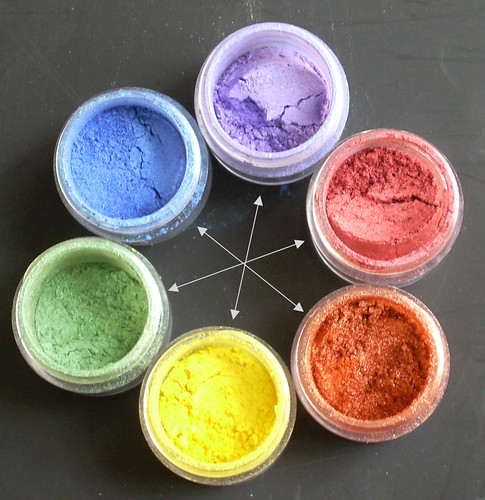


Blue-orange

Yellow-violet

Red-green


Split complementary hues are colors that are in opposite position on a color wheel, with one of the colors of the pair, shifted to the left or right


Aquamarine-orange

Indigo-yellow


Tints and shades are achieved by mixing a pure hue with white or black. Tints are lighter, and shades are darker. Tints can be achieved with mica pigments on clay by varying the quantity used. Both tints and shades can be achieved through blending pigments together.

There are many ways to help with the selection of color combinations. Magazines frequently will publish color pallets (a selection of hues) that they predict will be the season's popular colors, or are currently the popular colors. Keeping notes in your sketch book of color combinations you have seen and like, will help on future projects. Color choice is always going to be subjective, simply because different people favor certain hues over others.

Analogous colors are always pleasing combinations. An analogous range can be created with a “jump” or skip over a single color in the range.

To “jazz-up” a selection of analogous hues, add an accent color – such as in the example:

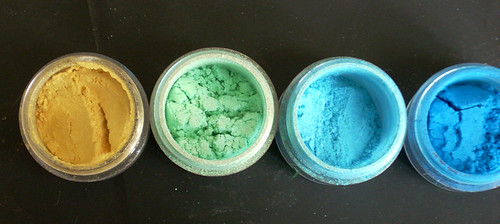
Yellow-aquamarine-blue (green was skipped)


Accent colors work well when they add contrast. A good way to achieve this is to select a complementary color.

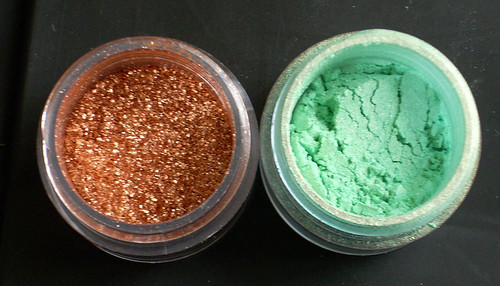
Pure complementary colors can be a bit jarring—think of bright red and green together. A modified complementary combination can be quite pleasing. Using a combination of split complementary with tints of the hues create very successful combinations. Copper and turquoise are a good example of this: copper represents the orange hue and turquoise is a tint of the aquamarine hue.


When planning on using mica pigments, the clay body color needs to be taken into consideration. The hue of the clay body will impact the tint and intensity of the applied mica pigments. Colors will not appear as bright on white as they will on black. Using a neutral base will give a more subtle effect.
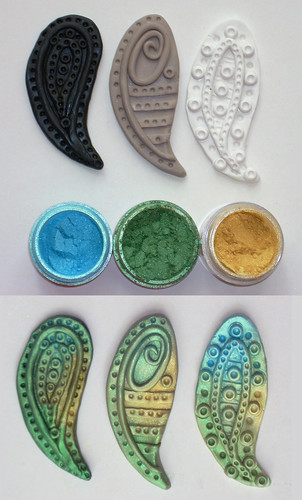


When using colored clay make pigment selections based on analogous hues. Using complementary hued pigments on colored clay will dull down the overall appearance. Interference, or color shift, pigments incorporate a bright accent hue- so the pigment seems to shimmer in a different color. Frequently the shift is to a complementary hue, or using a bright color on a colorless base. These are great for adding “jazz.” You need to pay attention to the shift color when using interference pigments. You don’t want to lose an exciting color shift by applying the pigment to a base clay the same color as the interference shift. Applying a color-less interference powder with a complementary color to a colored clay base will not dull the overall appearance but add the “oohhh aahh" effect.

Pigments can be blended to achieve almost any hue on the color wheel. Warning: when blending colors limit how many you use. Too many colors mixed together tend to end in a muddy color. Blending of complementary colors will also result in a mud color. Mica pigments are available commercially for the arts and crafts industry. Mica pigments make-up is also available, and can be used on polymer clay. Expanding into the world of powder and pressed powder eye shadow expands the range of hues and tints available. There are so many hues available it's almost not necessary to every need to blend pigments.

Always use mica powders safely. Use in a well ventilated area, and protect your lungs by wearing a face mask. Mica pigments are made from minerals and oxides, not something you want to inhale.

Friday, April 10, 2009

A beastie for you


PCAGOE Spring Fling Scavenger Hunt!
The members of PCAGOE, the Polymer Clay Artists Guild of Etsy, are sponsoring a Spring Fling Scavenger Hunt from April 13 to 24, 2009. To participate, visit my shop during that time and search for the hidden Spring Fling image among my items. When you find it, send me a convo me through Etsy that includes the URL of the listing where the image is hidden (or just click on “contact” from the item where the image is hidden, and the item info will automatically appear in the subject line.)

That's it! You must be a registered Etsy user to qualify, so if you have not already registered, please take a moment to do so, and you can join in our fun! Registering is fast and easy.

On April 24, 2009, I will draw a winner at random using an online random number generator. I will notify the winner by return convo and make arrangements to issue you the prize. I will also post the winner's name here on my blog. You can win beauty is a Beast! She is a fun silly shaker egg. Think of her a a designer rattle for adults.

Please visit our team website – http://pcagoe.com – for a complete list of participating shops and the prizes they are offering.

Friday, April 3, 2009

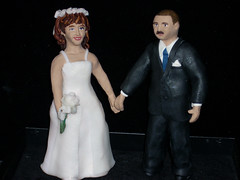
the happy couple


the happy couple
Originally uploaded by Zoeowyn
I did it! My first wedding couple!
Charlene almost cried when I gave them to her the other night. It was so sweet. Im so glad she liked them. I stressed over these. They weren't any more difficult than the belly dancers, just there was that extra level of wedding stress.
Im on my way!

Thursday, April 2, 2009

Faux


I actually got into polymer clay because of the faux technique. Specifically faux ivory
I was inspired by Victoria Huges, and made my mom this major necklace that featured a large piece of amber sitting in an ivory shield.
I still think I did pretty good. it was one of the first things I ever made in polymer clay.

Back then I had no idea how far it could go.

When I got back into polymer clay after a few years off it was to incorporate the faux ivory look with the PMC silver.
I make faux teeth and carved claw looking things. At one point a man who works in horn thought my work was the real thing until he picked it up. Apparently its too light! HA! I fooled an expert. That made my month back when that happened.


Now my polymer clay work has gone back to working with the colors and all, but I still love the faux claws and tusks stuff I do.
Currently in my shop Zoeowyn.etsy.com I have a pair of silver capped faux claw earrings.


Here are some other neat examples of the faux you can do with polymer clay:

ZsBcreations.etsy.com these earrings are faux ceramic tiles


These faux snake skin cuffs are from ArtByLilin.etsy.com


and this crazy faux geode piece is from beetreebyme.etsy.com. Crazy because look at how many different rocks she created!

Tuesday, March 31, 2009

April Earring Sale!!!


Im having a big earring sale at my etsy store--go buy earrings!
zoeowyn.etsy.com
and in the buyers comments (if you actually got there from here) say the easter bunny sent you, and I'll ship your order for free!
international too!

Thursday, March 26, 2009

Plays well with others


Polymer is fun, it can do so many things, and it works so well with other elements.
Here are some interesting and fun finds with polymer and other elements
Steam punk fairy this is too funny--in a good way!

It incorporates other materials well

Look at this colorful pendant by juliespace It includes a variety of glass beads

And another, yet different idea:

this is silver clay with polymer added for color byPeculiarForest
So many ideas so little time

Tuesday, March 10, 2009

Turquoise fairy on pile of beads


turquoise fairy on pile of beads
Originally uploaded by Zoeowyn
My personal challenge this year is to finish what I have started. All of those projects I have thought worthy of starting, are they worthy of finishing? If they aren't Im not too sure what I will end up doing with them, possibly just seeing if I can sell them to someone else to finish--i seem to actually have success at doing that.
Of course that falls into me as catalyst.
I am. With out actually working too hard at it, I manage to get other people going.

This fairy or muse face was actually done as a quick sample. I mostly used scrap clay and what ever beads were out when I "slapped" her together. It wasn't until later that i noticed she matched a back of turquoise I got in New Mexico. At that point I knew she was going to be strung on those beads. Now that was over 1 year and a half ago.

I am very pleased with how she did end up turning out. And Im on a roll just finishing things. I have only one item left in the big things to finish box!!! Of course it feels like there are a million things in the box of little things to finish, but Im starting some place!

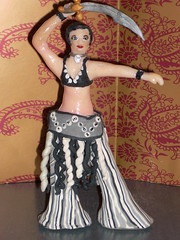
Polymer Polly Belly Dancer


Polymer Polly ta-da
Originally uploaded by Zoeowyn
Well this is my second dance figurine. There are some visible errors to me, but she is cute, and turned out pretty darn good.
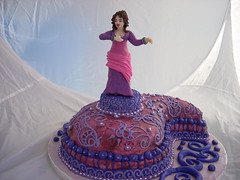
I took her to my dance class this evening to show off. One of my students is getting married in a few weeks, she saw this and thought she was adorable, I asked if I could make her cake topper as her wedding gift--she was thrilled!

OMG
What have I done?

I mean yes, this is what i want to do, this is the direction I want to take my crafting work, I did it I made and took my big first step!

Dancing Diana and Polymer Polly were my test walks. Its now time to run!


Once the wedding topper is done, I will put them on etsy!

Friday, March 6, 2009

BEADS!


insideout done
Originally uploaded by Zoeowyn
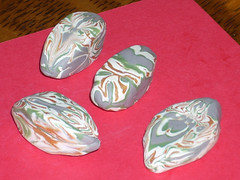
Ok so I have been obsessing about beads. Making them. I went to a little bead and gem show and there was this nice lady there who spend a lot of time with myself and my daughter, explaining things to the kid. Of course kid was just being a sponge and soaking in all kinds of information. The lady was selling these things called inside out beads. They were fascinating. Not quite cane work in polymer but similar. We bought some of her lovely beads. At home I spent 4 hours figuring them out!

So now Ive been playing with making beads. These samples of mine arent even my best ones--just the ones I have a photo of! lol!

I went searching to see what others are doing bead creation-wise.
There is some very beautiful work out there for the buying!


SarajaneHelm.etsy.com
This set of beads has a nice spring like quality with out the pollen.


And check out these "jade" beads! Those are made from polymer clay
RMKDesign.etsy.com


heres another nifty set of beads. I love the swirlies! Im still developing the skills to do the swirly shape--its not as easy to get a really good and clean swirl as they make it look. These are by oneandonly.etsy.com

Friday, February 27, 2009

Canes!

So I have placed my first set of raw polymer clay canes for sale on etsy.
There are quite a few artists who do this.
Of course my canes don't look like theirs--thats good, that way we aren't competing for the same artists. I know there are artists out there for my canes.

These are some nice ones I found while checking out the viability of actually posting raw canes.


BreathtakingBeadzz.etsy.com
she makes some lovely floral and butterfly canes. Her finished beads are beautifully feminine


Beadopolis.etsy.com
There isnt much in this shop yet, but Wes, has gotten cane making down to a science!
hes posted it on his blog
http://caninable.blogspot.com/2009/01/cane-reduction-beado-bunge4000.html


yonatdascalu.etsy.com also has some lovely canes. I like this purple spiral.

Thursday, February 26, 2009

Medaevil manuscript cane set


Medaevil manuscript cane set
Originally uploaded by Zoeowyn
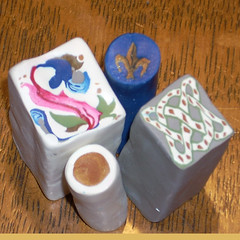
This set of 4 canes are all based on pieces/design elements that you could find in medaevil illuminated manuscripts. I took a class to the museum to see an exibit, and I fell in love with the little detail work in the illuminations. I decided I needed to try to make that in clay. There is a simple gold dot, a small fleur de lis on a dark pearl blue back ground, and celtic knot, and a colorful floral design. All 4 canes are made from Sculpey III, and they all use the same colors. They were designed to be used together.

Thgis is my entry for the March PCAGOE challenge. To see other entry pieces, and to vote on your favorite visit http://www.pcagoe.com

Valentine heart crayons 09-2


Valentine heart crayons 09-2
Originally uploaded by Zoeowyn
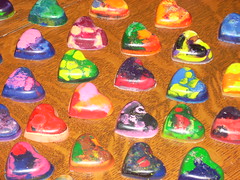
Last year a friend and I decided instead of sending our kids to school with even MORE candy for valentines day we would make heart shaped crayons. The kids had a blast chopping up old crayons and melting them into these heart shapes. This year my kids and I did it again. They both really enjoyed the process-even though momy had to finish the last batch--short attention span theater. The better quality crayons have less wax in them and make for better crayons, the ones with more wax end up creating very cool color layers.

Tuesday, February 10, 2009


I fell in love with sea horses last year. We did a day trip to the Chattanooga aquarium, they had an exhibit of sea horses and sea dragons.
I was amazed. they are so beautiful!
I spent at least the next month drawing them. Im actually surprised I didnt make hundreds of little polymer ones.
I even found a wire artists who makes some wonderful little ones.


Seahorse by pippijewelry.etsy.com


I also learned from her site, that they a caught live and left under heat lamps to dry out. to be put in all those curio things. That makes me sad. i think I may have some from a craft store. i got them when i thought they were nifty, but i didnt et any after last years adventure. Im glad, because that treatment makes me sad. Anyway these can be quite tiny up to quite large.
I could watch them all day. Their variation in colors was glorious.

I am taking a polymer clay clay with christi Friesen. its on-line (I love on line learning but thats another story). The class is steam punk gryphons. I have been wondering how to incorporate steam punk into polymer for a bit now. Well as soon as the class got started I started seeing how to incorporate steam punk in other things. I made a great dragon fly--at least I like him, and this sea horse. Both figures are large, and not jewelry size. i will need to figure out what to do with them.
The next challenge will be to make a sea horse small enough to wear, and a steam punk octopus!

Heres anpother cute little sea horse by urbanwoodswalker.etsy.com


and a cute almost steam punk octopus by societysedso.etsy.com